- 인터넷은 우리에게 자유를 주었습니다. 저희는 자유를 얻기 위해 지식을 통합하고 체계화하고 공유합니다. 랜선 위 정글에서 살아남기 위해 저희는 시키는 일만 하는 꿀벌 대신 고객을 위해 창조하고 혁신하는 게릴라가 되겠습니다. Seenbuy.kr is now Aiforu.kr.
- 024042463
- 01032667931
- [email protected]
Make.com(이전 Integromat)
What is Make?
이전 Integromat
What is Make?(1:10)
자동화를 통해 시간과 리소스를 절약해야하는 스타트업에게 훌륭한 솔루션입니다.
Make.com은 다양한 앱과 시스템을 연결하여 작업을 자동화하는 데 사용할 수 있는 강력한 도구입니다. Make를 사용하면 다음과 같은 작업을 자동화할 수 있습니다.
- 이메일 보내기
- 파일 업로드
- 데이터 입력
- SMS 메시지 보내기
- 소셜 미디어 게시물 게시
- 기타
Make는 시각적 인터페이스를 사용하여 작업을 자동화할 수 있도록 설계되었습니다. 따라서 코딩에 대한 지식이 없어도 Make를 사용하여 작업을 자동화할 수 있습니다.
Make는 개인, 기업, 비영리 단체 등 다양한 사용자가 사용할 수 있습니다. Make를 사용하면 시간과 노력을 절약하고 생산성을 높일 수 있습니다.
Make.com은 다음과 같은 기능을 제공합니다.
- 다양한 앱 및 시스템과의 통합
- 시각적 인터페이스
- 코딩이 필요하지 않음
- 다양한 작업 자동화
- 개인, 기업, 비영리 단체 사용 가능
Make.com은 다음과 같은 장점을 제공합니다.
- 시간과 노력 절약
- 생산성 향상
- 복잡한 작업 자동화
- 다양한 사용자에게 적합
Make.com은 다음과 같은 단점을 제공합니다.
- 무료 버전은 제한적입니다.
- 일부 기능은 사용하기 어려울 수 있습니다.
Make.com은 다양한 작업을 자동화하고 생산성을 높이는 데 유용한 도구입니다.
Make Academy
Make Help Center
https://www.make.com/en/help/home
시나리오 만들기
Make 가 작업을 자동화 하려면 시나리오를 작성해야 합니다 . 시나리오 는 앱/서비스 간에 데이터를 전송하고 변환하는 방법을 나타내는 일련의 모듈 로 구성됩니다.
시나리오를 만드는 데는 4단계가 있습니다 .
예: 새로 수신되는 이메일을 Google 시트에 새 행으로 추가
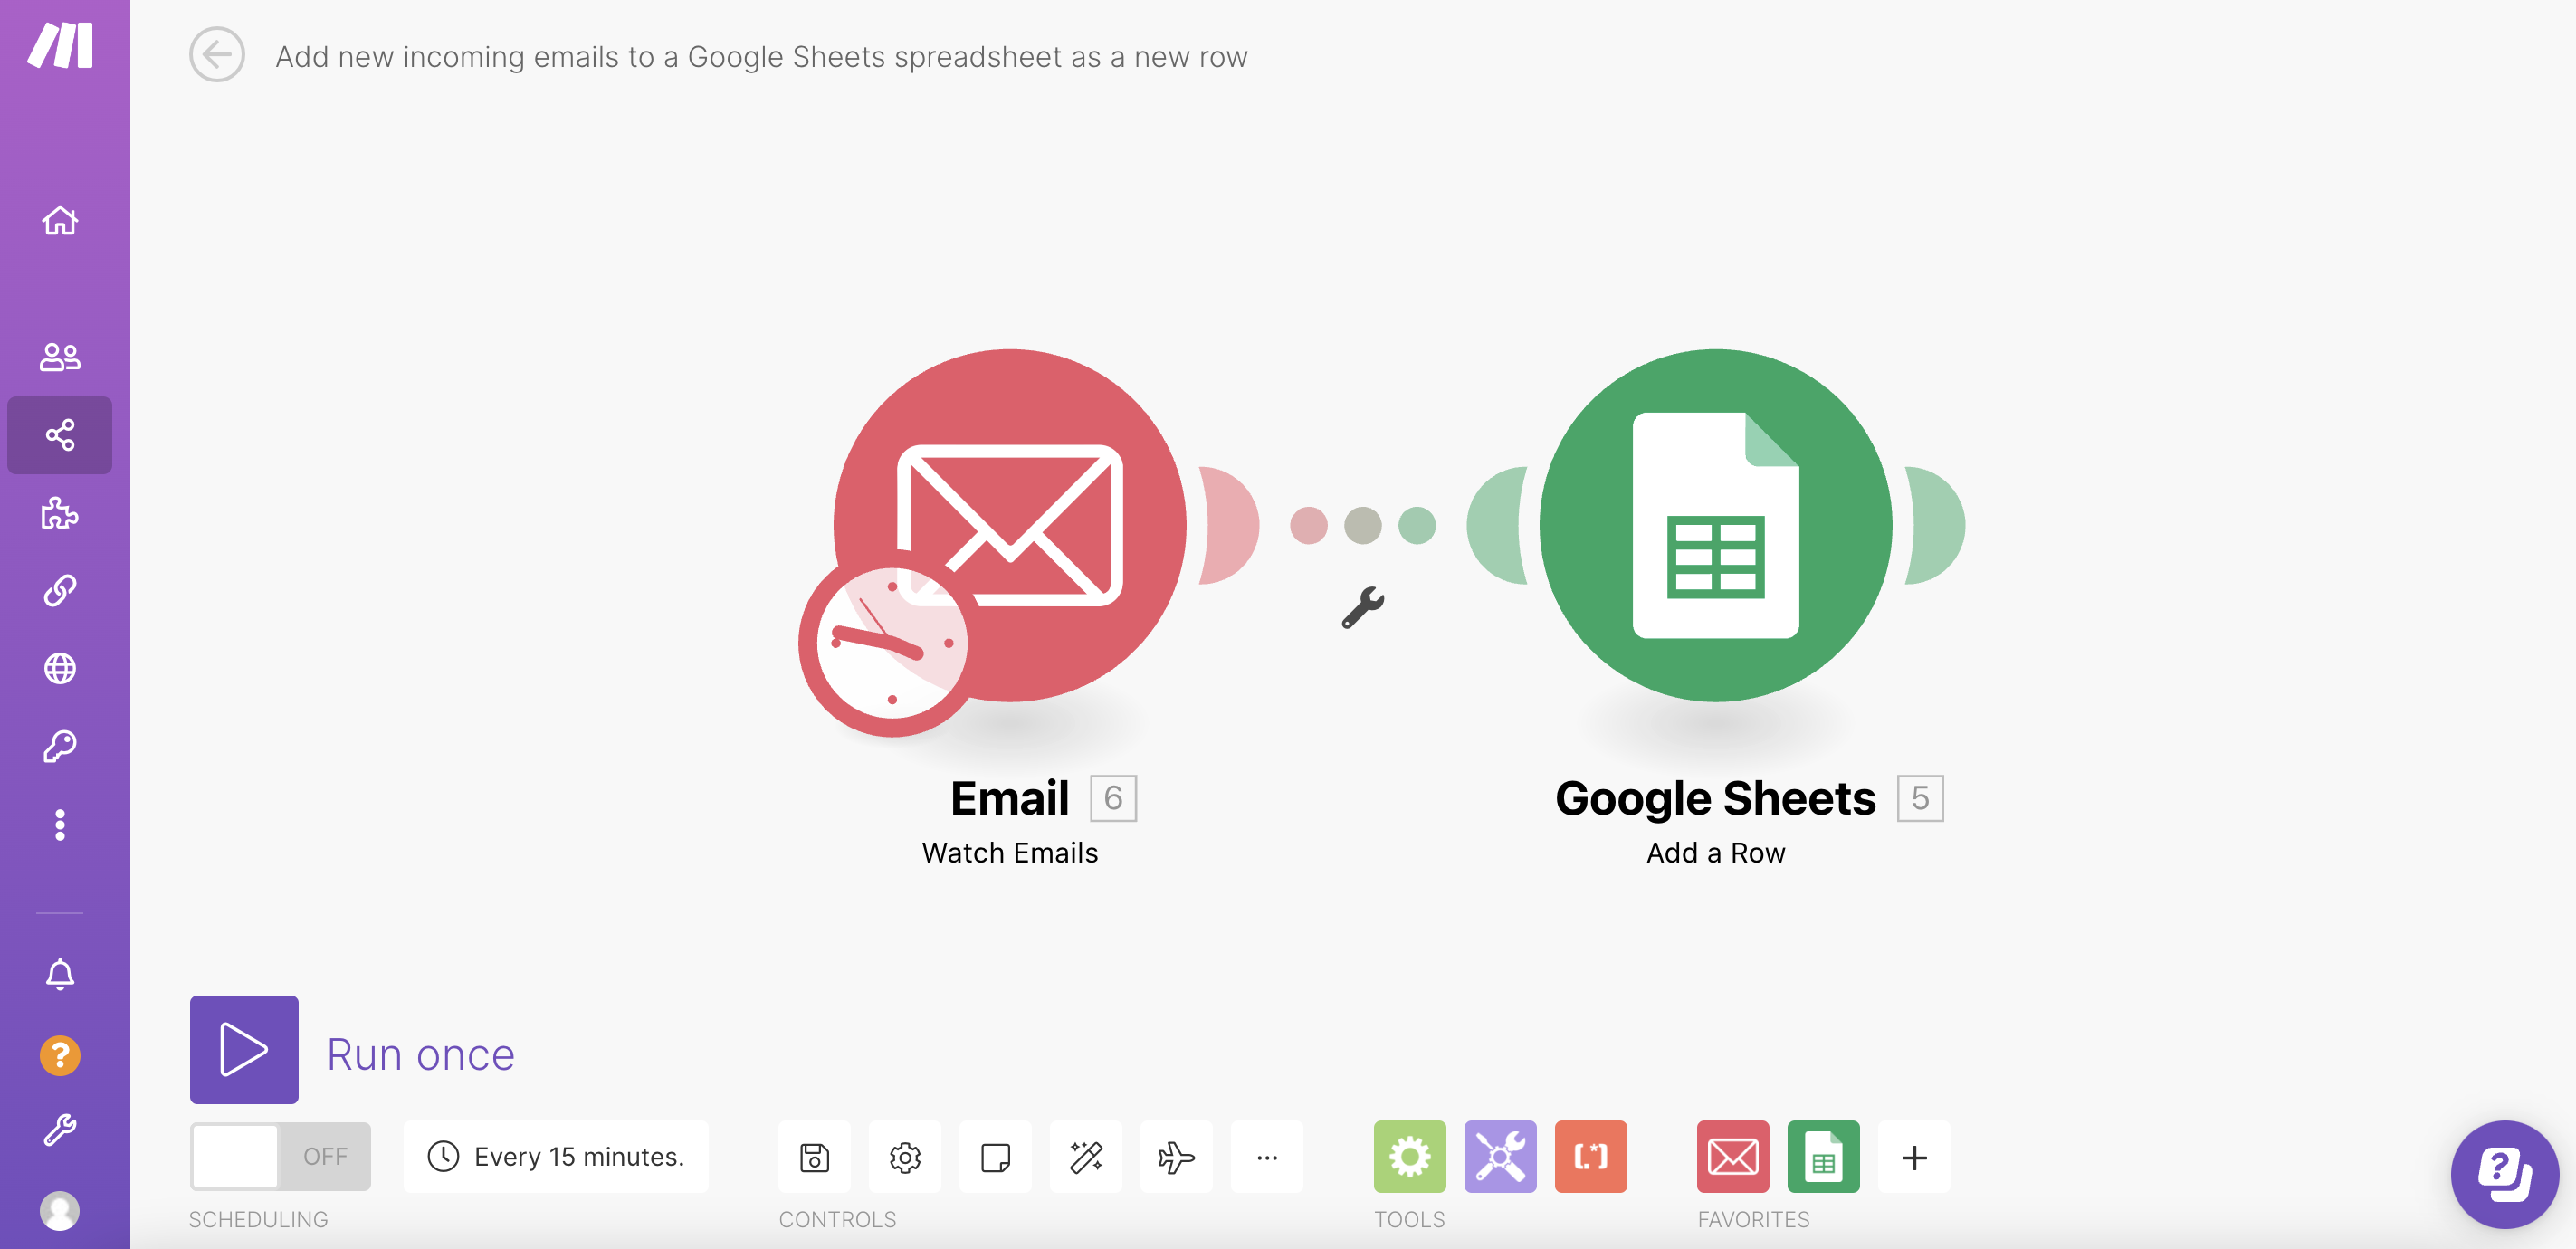
시나리오 작성 방법을 예시하기 위해 프로세스를 단계별로 진행하겠습니다. 예시 시나리오 에서는 새로 수신되는 이메일을 Google 스프레드시트 스프레드시트에 새 행으로 추가합니다.
메모
시나리오 생성을 시작하기 전에 Make 계정 에 로그인했는지 확인하세요 .
1단계: 앱 선택
- 조직 대시보드로 이동하여 새 시나리오 만들기 버튼을 클릭하세요.
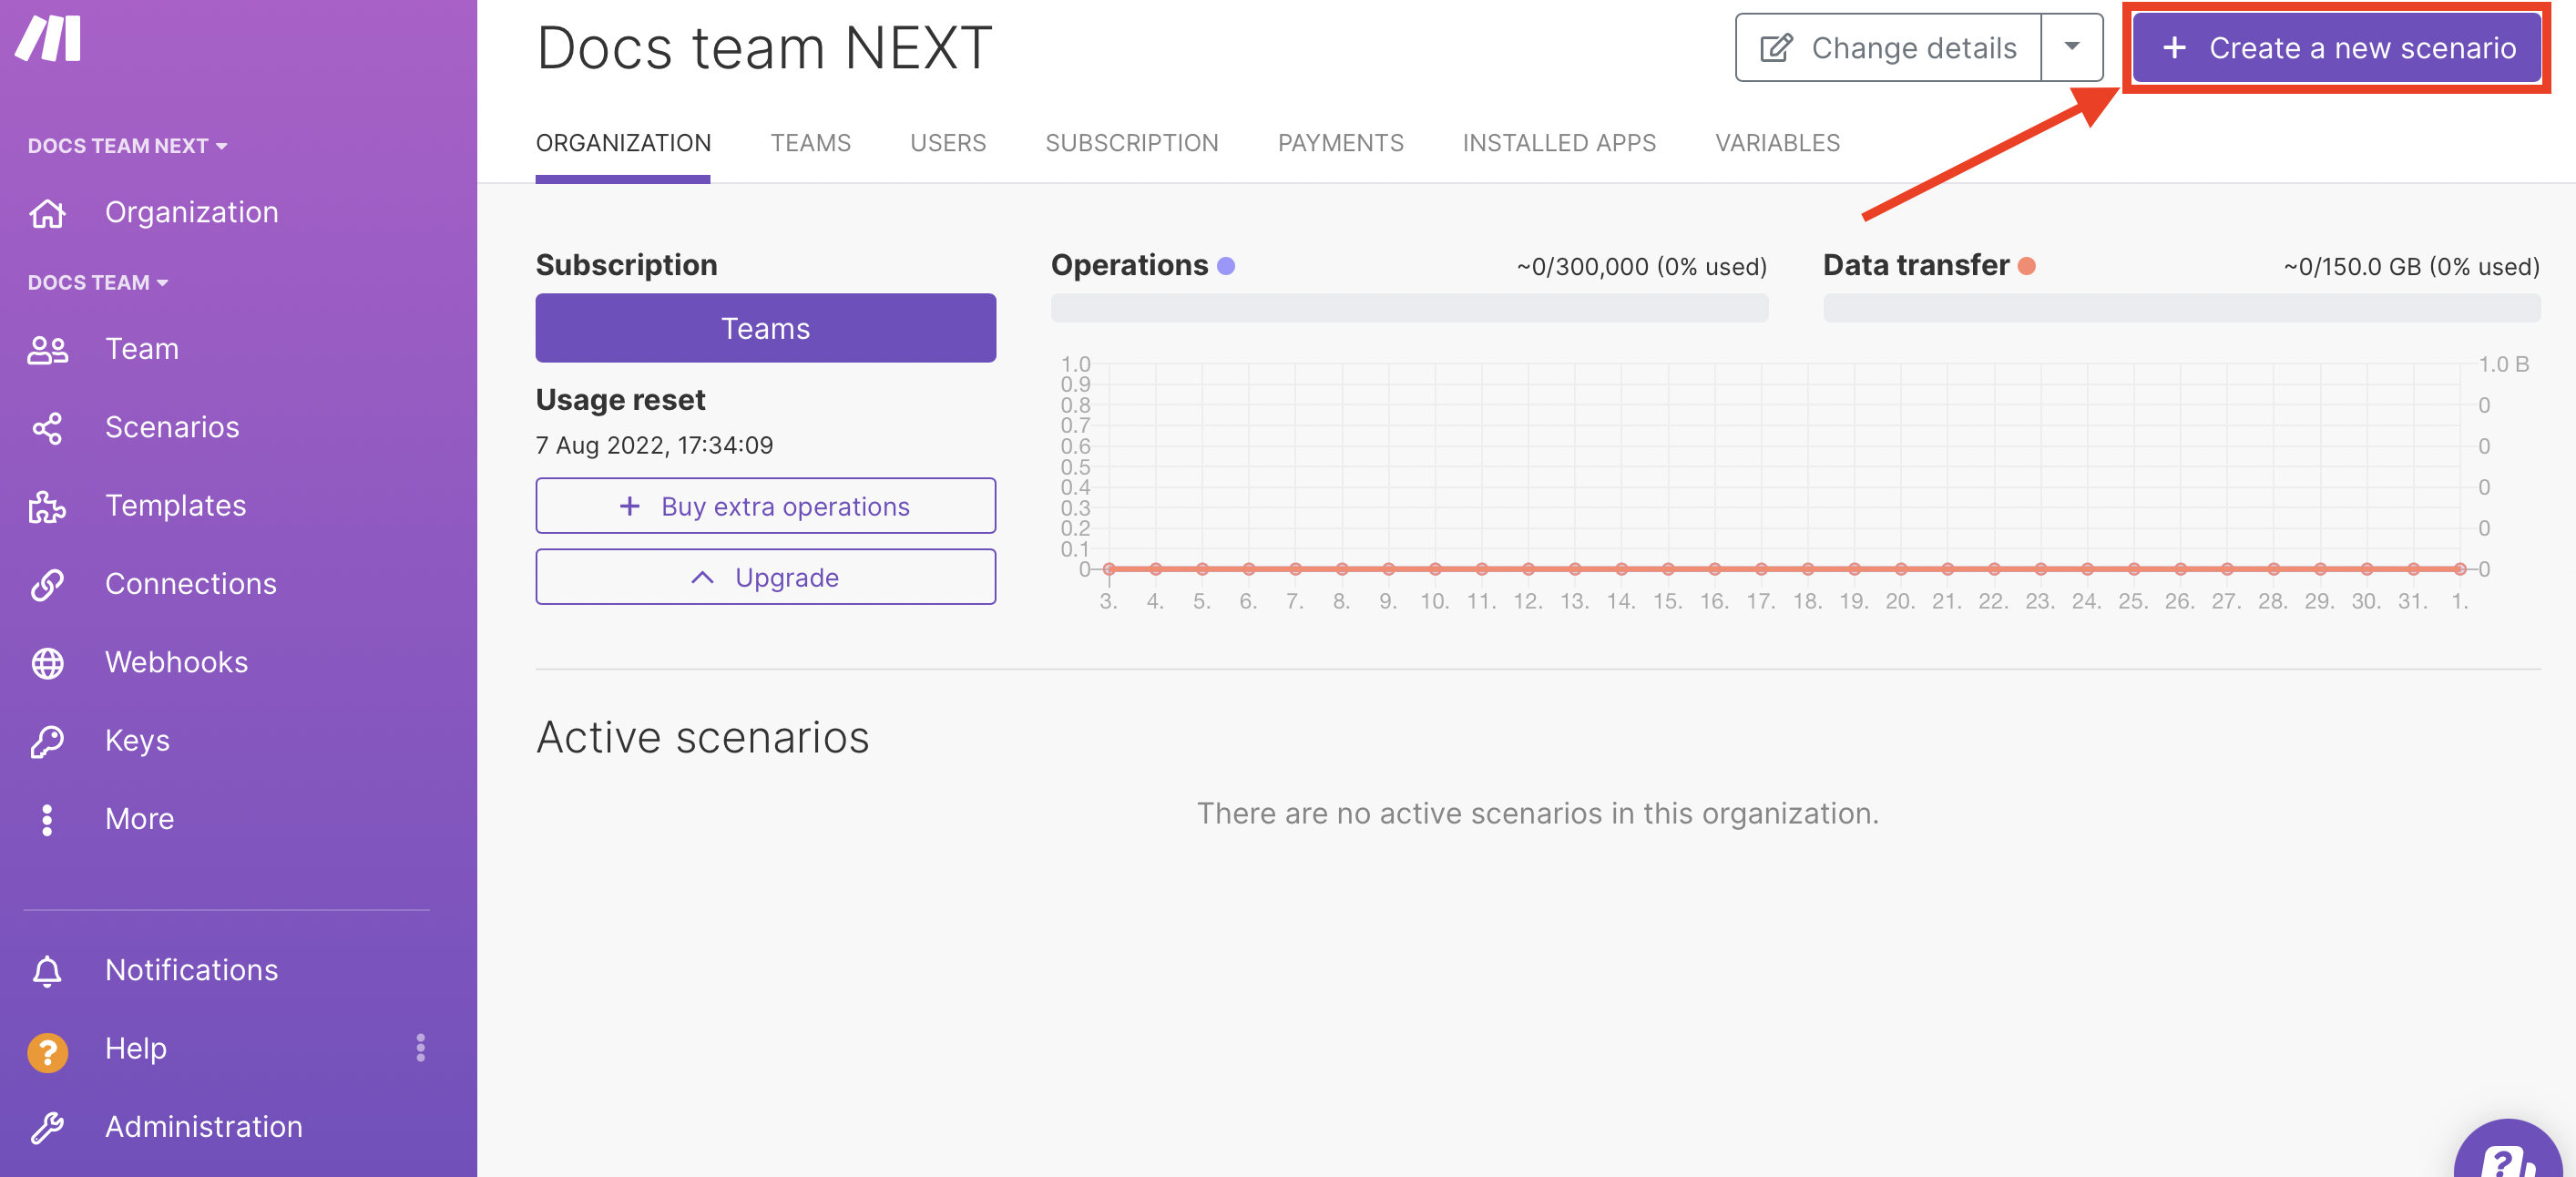 시나리오 > 새 시나리오 만들기 로 이동할 수도 있습니다 .
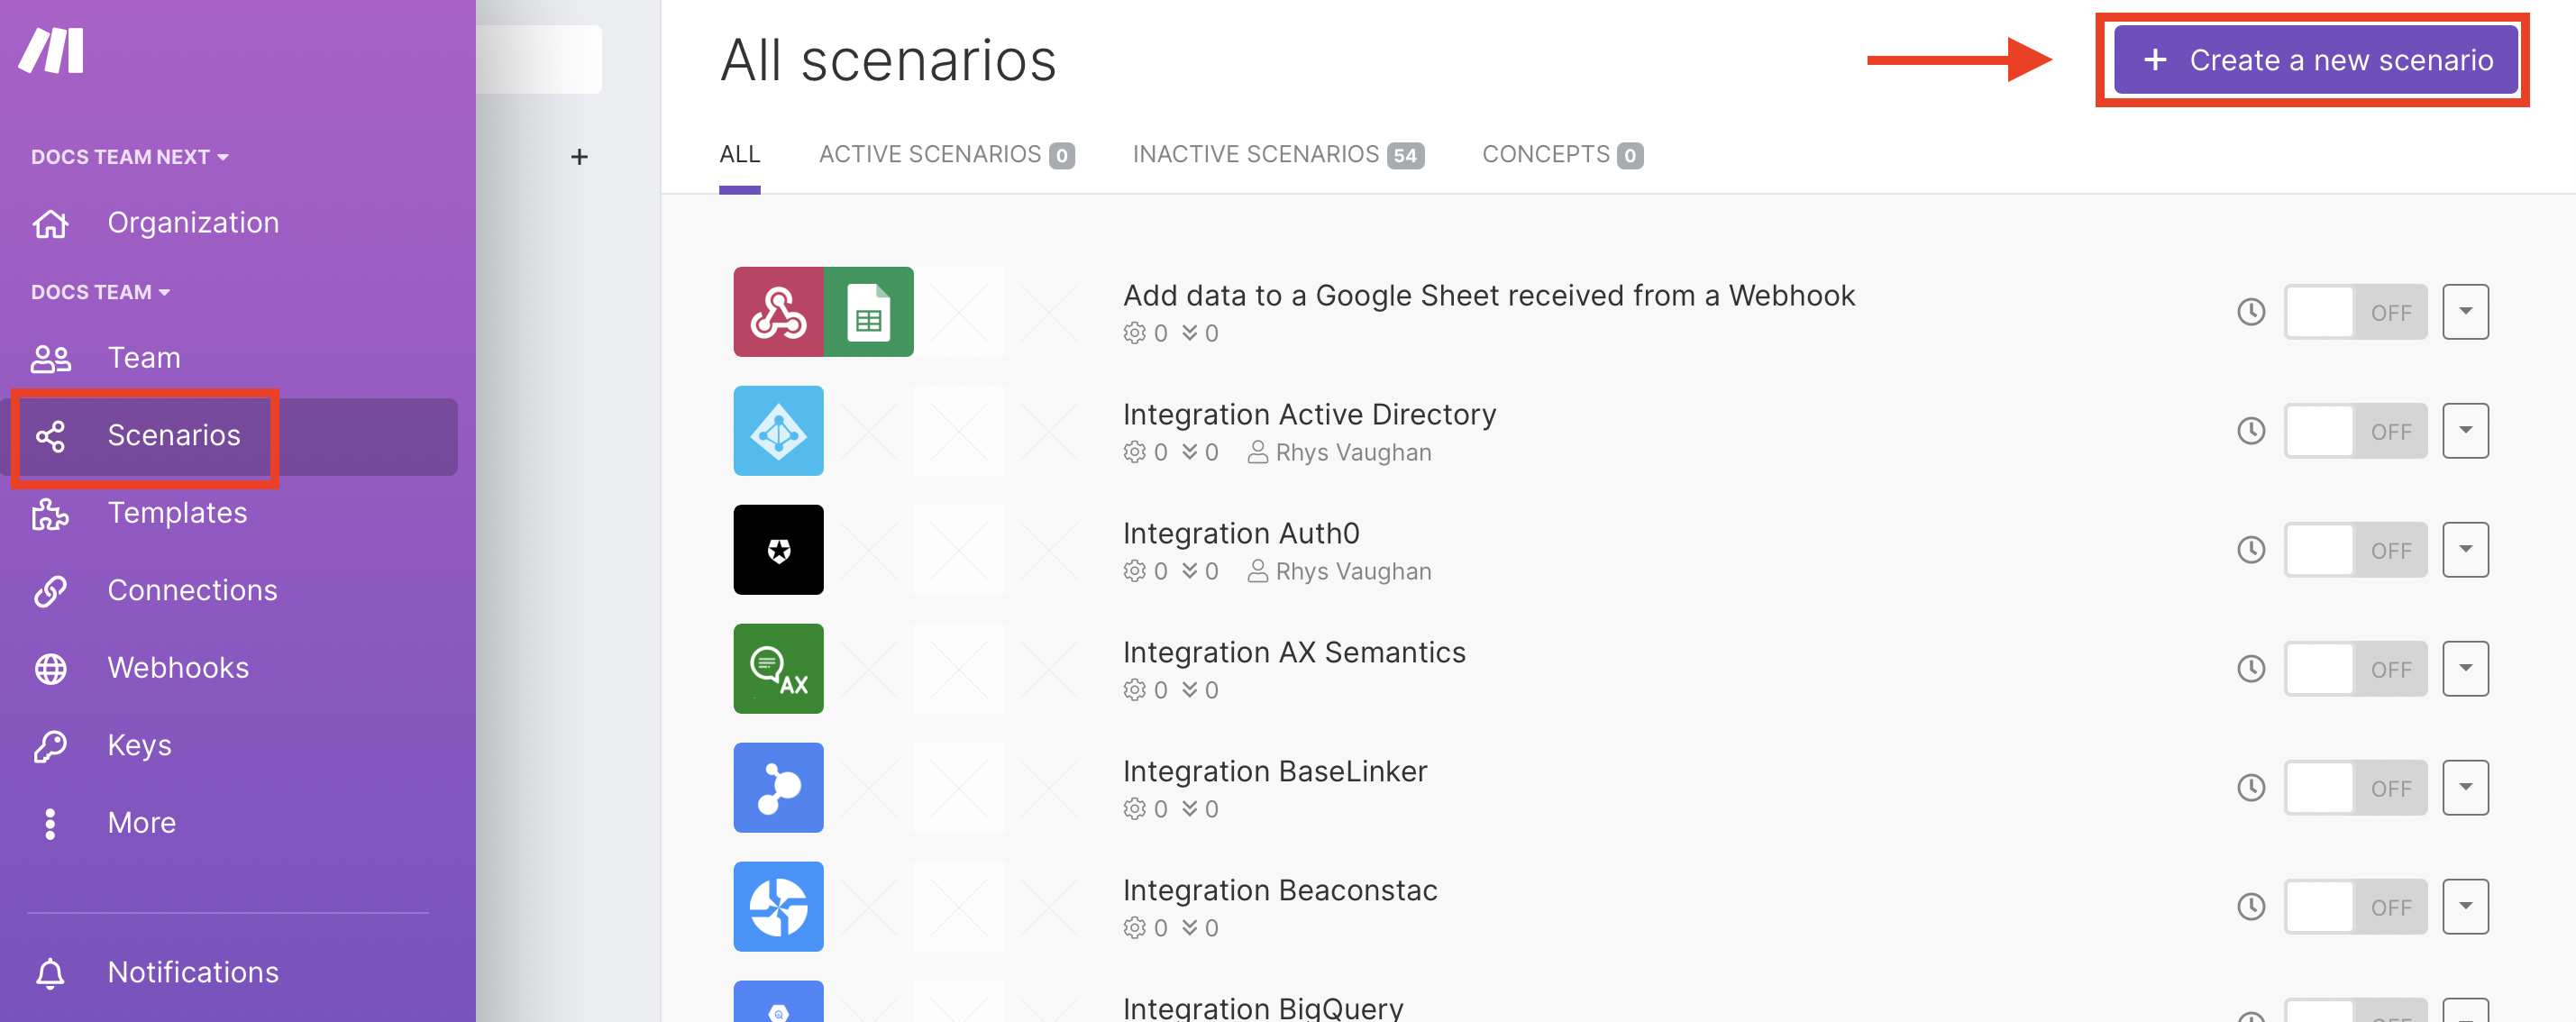
- 더하기 아이콘을 클릭하세요. 앱 목록이 나타납니다. 검색창에서 사용하려는 앱을 검색하세요. 이 경우 이메일 을 검색하세요 .
2단계: 시나리오 구축
이메일 모듈 추가
보고 싶은 이메일이 있는 폴더를 선택하세요.
- 시나리오 > 새 시나리오 만들기 로 이동합니다.
- 이메일 추가 > 이메일 모듈 보기.
- 이메일에 대한 연결을 만듭니다 .
- 보고 싶은 이메일이 있는 폴더를 선택하세요.
- 드롭다운 메뉴에서 보고 싶은 이메일의 기준을 선택하세요.
- ( 선택사항 )특정 이메일 주소에서 보낸 이메일, 특정 문구가 포함된 이메일 등을 시청할지 여부를 지정하세요.
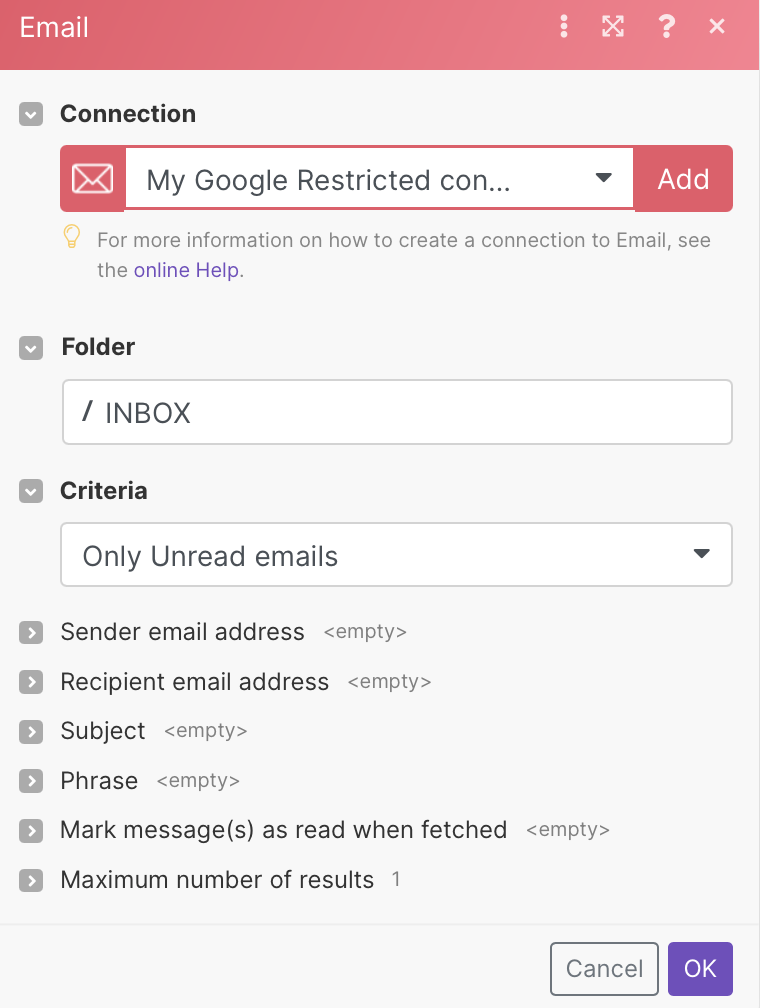
- 확인을 클릭하여 저장하세요.
- 팝업이 나타납니다. 이메일 시청을 언제 시작할지 선택하세요.
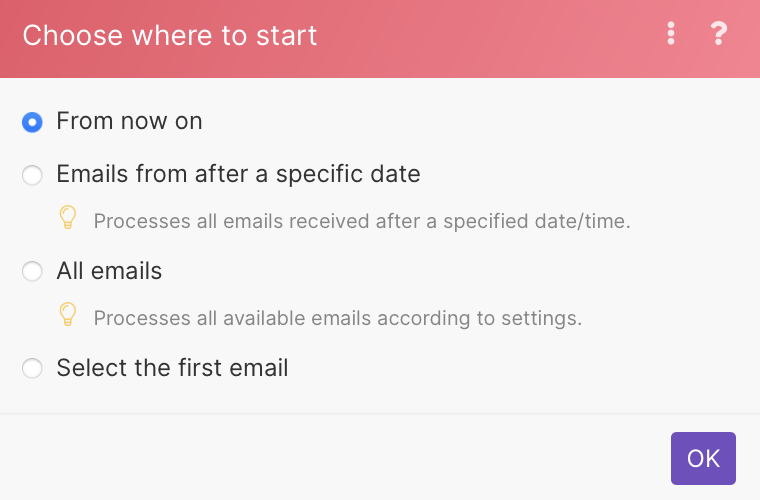
- 확인을 클릭하여 저장하세요.
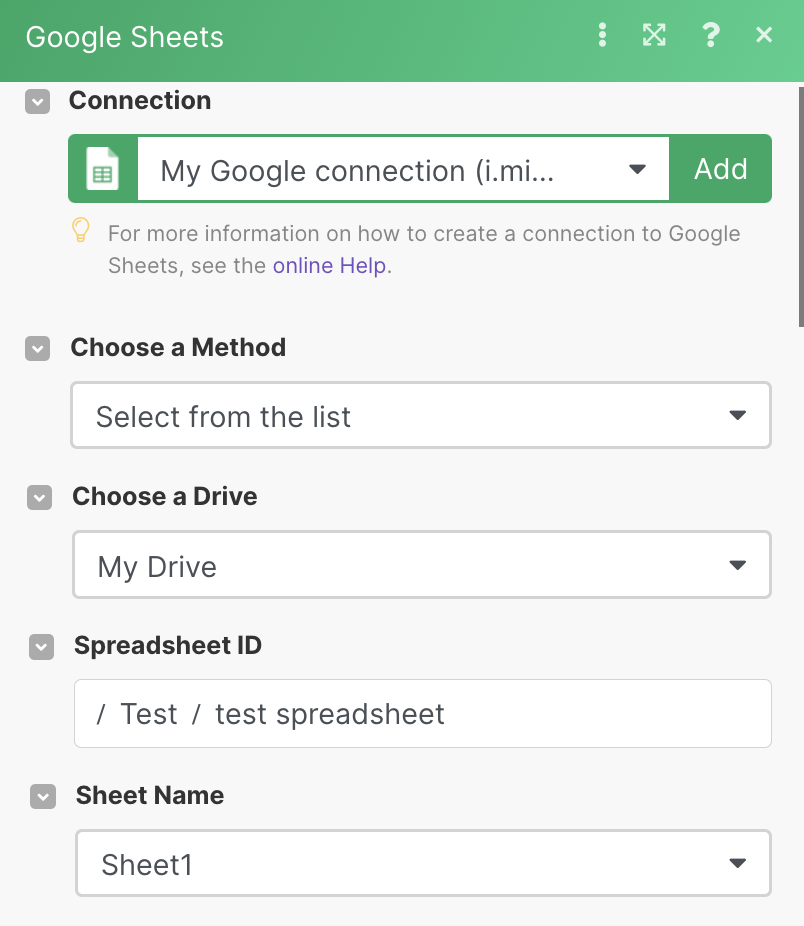
Google Sheets 추가 > 행 모듈 추가
- 이메일 모듈의 오른쪽 부분 위로 마우스를 가져갑니다. 더하기 기호가 나타납니다.다른 모듈 추가 를 클릭합니다 . 빈 모듈이 나타납니다.
- 원하는 모듈을 검색하여 클릭하세요. 이 경우 Google 스프레드시트 > 행 모듈 추가를 선택하세요.
- Google 계정에 대한 연결을 만듭니다 .
- 방법 선택 아래에서 목록에서 스프레드시트를 선택할지 아니면 수동으로 선택할지 선택합니다.
- 드라이브 선택 에서 드라이브를 선택합니다.
- 스프레드시트 ID 에서 스프레드시트를 선택합니다.스프레드시트가 폴더에 있으면 먼저 폴더를 선택하세요. 그런 다음 더하기 기호를 클릭하여 폴더에서 특정 스프레드시트를 선택합니다.
- 시트 이름을 선택합니다.
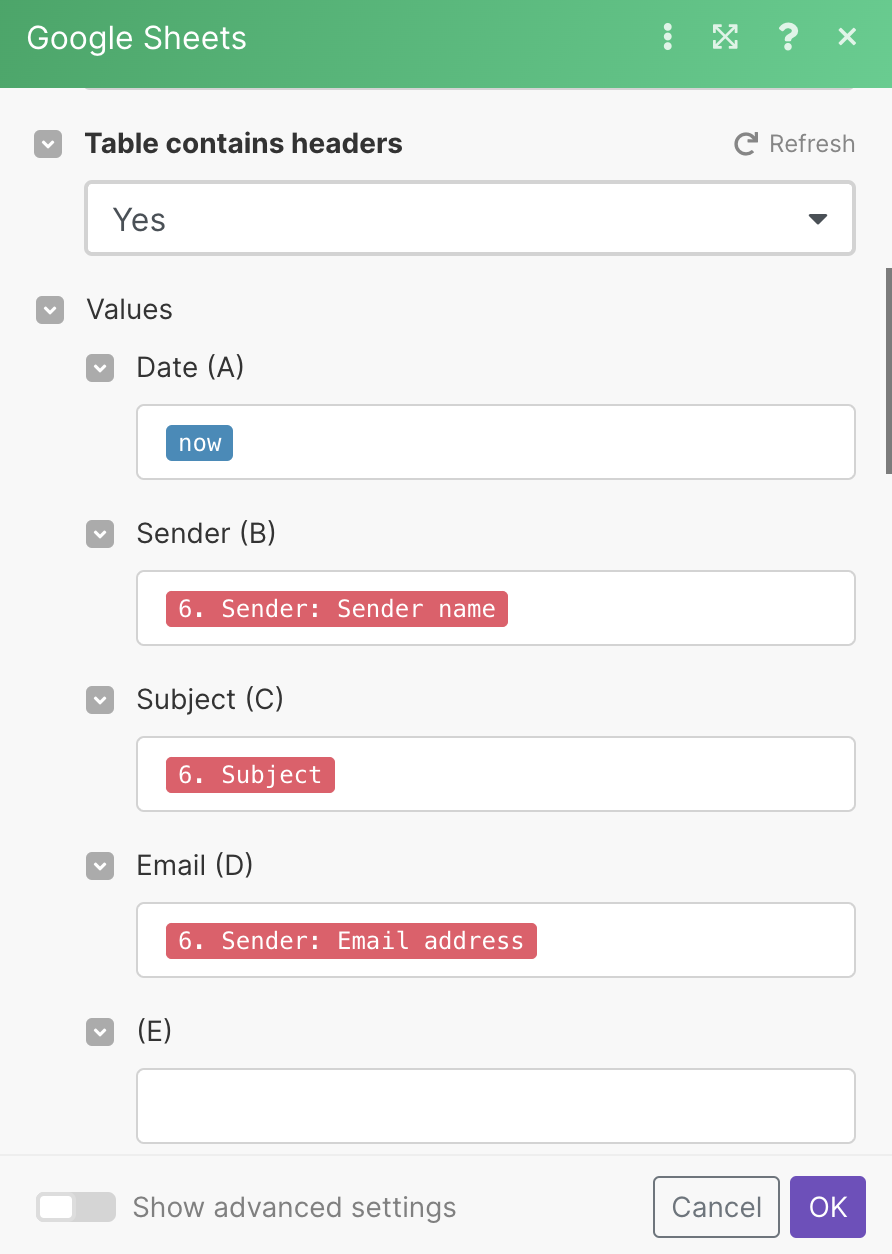
- 테이블에 헤더가 포함되어 있는지 선택하세요. 우리 테이블에는 헤더가 포함되어 있지만 여러분의 테이블에는 그럴 필요가 없습니다.
- 값에서는 스프레드시트에 가져오려는 데이터를 매핑합니다.테이블에 헤더가 있는 경우 괄호 안의 문자 앞에 헤더 이름이 표시됩니다.
- 확인을 클릭하여 저장하세요.
메모
보다 강력한 시나리오를 위해서는 원하는 모듈을 모두 추가할 때까지 2단계와 동일한 단계를 반복하세요.
3단계: 시나리오 테스트
시나리오를 활성화하고 예약하기 전에 시나리오를 테스트하여 모든 것이 제대로 작동하는지 확인 해야 합니다 .
- 시나리오를 테스트하려면 한 번 실행 버튼을 클릭하세요 .
- 모듈 상단에 버블이 나타나 처리된 데이터 또는 번들 이라고 하는 데이터에 대한 정보를 제공합니다 .작업 수를 포함하여 처리된 번들 에 대한 정보를 표시하려면 숫자를 클릭하십시오 . 개별 작업을 클릭하면 어떤 모듈 설정이 사용되었는지, 어떤 모듈에서 어떤 번들이 반환되었는지 확인할 수 있습니다.자세한 내용은 실행 흐름 섹션을 참조하세요.
시나리오를 통해 데이터가 어떻게 흐르는지 확인하려면 시나리오를 테스트하는 것이 중요합니다 . 또한 시나리오 에 오류가 있는지 표시하는 데도 도움이 됩니다 .
메모
어떤 시나리오 에서든 오류가 발생하면 오류 처리 섹션을 참조하세요 .
4단계: 시나리오 예약 및 활성화
시나리오 를 실행할 준비가 거의 완료되었지만 아직 비활성 상태입니다.
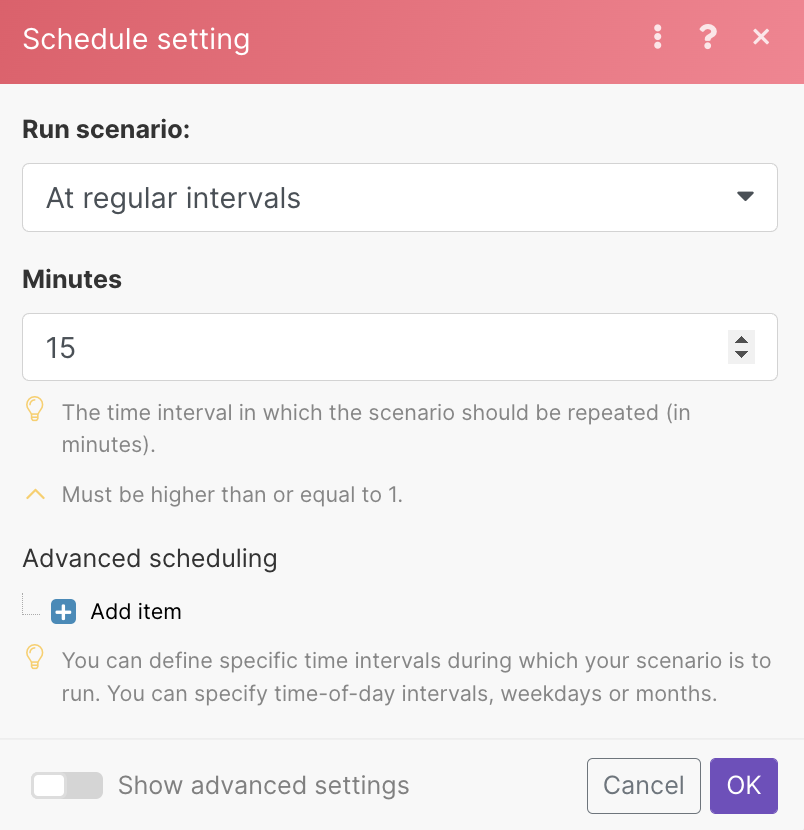
- 시나리오를 예약하려면 일정 설정을 클릭하세요.
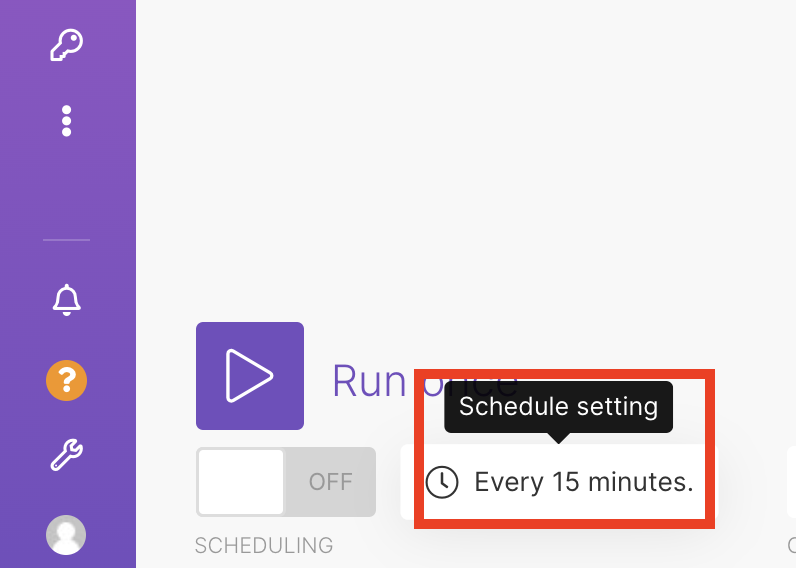
- 시나리오 실행 빈도를 설정합니다 .
- 확인을 클릭하여 저장하세요.
- 시나리오 를 활성화 하려면 아래 애니메이션과 같이 왼쪽 상단에 있는 화살표 아이콘을 눌러 시나리오 편집기를 종료하세요 .
 ON/OFF 버튼을 클릭하여 시나리오를 활성화하고 일정을 설정하세요 .
활성화되면 시나리오는 일정 에 따라 실행됩니다 .
시나리오 편집기 에 대한 자세한 내용은 시나리오 편집기 설명서를 참조하세요 .
중요한 용어
시나리오 활성화
시나리오는 활성 또는 비활성 입니다 . 시나리오 상세정보 에서 ON/OFF 버튼을 클릭하여 시나리오 상태를 변경할 수 있습니다 .
시나리오 일정
활성 시나리오는 일정에 따라 실행됩니다. 시나리오 예약을 참조하세요 .
시나리오 이름
시나리오 이름을 바꾸려면 왼쪽 상단에 있는 시나리오 이름을 클릭하세요 . Enter 키를 누르거나 편집된 필드 외부를 클릭하여 새 시나리오 이름을 저장합니다.

첫 번째 번들 선택
트리거를 사용하면 시나리오 에서 처리하려는 첫 번째 번들을 선택할 수 있습니다 . 첫 번째 번들 선택을 참조하세요 .
반품된 번들 수
모듈은 기본적으로 항상 두 개의 번들만 반환합니다. 모듈 설정 필드에서 이를 변경할 수 있습니다. 반환된 번들의 최대 수입니다 .
고급 시나리오 설정
Make를 사용하면 다양한 기타 고급 설정을 구성할 수 있습니다. 시나리오 설정을 참조하세요 .
Creating a scenario
In order for Make to automate your tasks for you, you have to create a scenario. A scenario comprises of a series of modules that indicate how data should be transferred and transformed between apps/services.
There are 4 steps to creating a scenario:
Example: Add new incoming emails to a Google Sheet as a new row
To exemplify how to create a scenario, we will go through the process step-by-step. In our example scenario, we are adding new incoming emails to a Google Sheets spreadsheet as a new row.
Note
Before you begin creating any scenario, ensure you are signed in to your Make account.
Step 1: Choose your apps
- Go to your organization dashboard and click Create a new scenario button.You can also go to Scenarios > Create a new scenario .
- Click the plus icon. A list of apps appears. In the search field, search for the app you want to use. In this case, search for Email.
Step 2: Build your scenario
Add Email module
Select the folder whose emails you want to watch.
- Go to Scenarios > Create a new scenario
- Add Email > Watch email module.
- Create a connection to your email.
- Select the folder whose emails you want to watch.
- Select the criteria of the emails you want to watch from the dropdown menu.
- (optional)Specify if you want to watch emails from a specific email address, emails that contain a specific phrase, etc.
- Click OK to save.
- A pop-up appears. Choose from when to want to start watching emails.
- Click OK to save.
Add Google Sheets > Add a row module
- Hover over the right part of the Email module. The plus sign appears.Click Add another module. An empty module appears.
- Search for and click the module you want. In this case, select Google Sheets > Add a row module.
- Create a connection to your Google account.
- Under Choose a method, select whether you want to select your spreadsheet from the list or manually.
- Under Choose a Drive, select your drive.
- In Spreadsheet ID, select your spreadsheet.If your spreadsheet is in the folder, first select the folder. Then, click the plus sign to select the specific spreadsheet in the folder.
- Select the sheet name.
- Select whether your table contains headers. Our table contains headers, but yours doesn’t have to.
- In values, map the data you want to get in your spreadsheet.If your table has headers you will see the header names before the letter in brackets.
- Click OK to save.
Note
For more robust scenarios, repeat the same steps as in Step 2 until you add all the modules you want.
Step 3: Test your scenario
Before you activate and schedule your scenario, you should test your scenario to check if everything is working properly.
- Click the Run once button to test your scenario.
- Bubbles appear on top of the modules, which gives you information about the processed data, or what is referred to as bundles.Click the number to display the information about the processed bundles, including the number of operations. By clicking the individual operations, you can see which module settings were used and which bundles were returned by which module.For more information, see the Execution flow section.
Testing your scenario is vital for seeing how data flows through your scenario. It also helps to show if there are any errors in your scenario.
Note
If you encounter an error for any scenario, see our Error processing section.
Step 4: Schedule and activate your scenario
Your scenario is almost ready to run, but it’s still inactive.
- To schedule your scenarios, click on the Schedule setting.
- Set how often you want your scenario to run.
- Click OK to save.
- To activate your scenario, exit the scenario editor by hitting the arrow icon in the top-left corner, as shown in the animation below.Click the ON/OFF button to activate your scenario and setting up the schedule.
Once activated, your scenario will run according to its schedule.
For further details on Scenario editor, please visit our Scenario editor documentation.
Important terms
Scenario activation
Scenarios are active or inactive. You can change the scenario status by clicking the ON/OFF button in the scenario detail.
Scenario schedule
Active scenarios execute according to a schedule. See Scheduling a scenario.
Scenario name
To rename your scenario, click on the scenario’s name in the top left corner. Press ENTER or click outside the edited field to save the new scenario name.
Selecting the first bundle
Triggers allow you to select the first bundle that you want to process in the scenario. See Selecting the first bundle.
Number of returned bundles
Modules, by default, always return only two bundles. You can change this in the module settings field Maximum number of returned bundles.
Advanced scenario settings
Make allows you to configure a number of other advanced settings. See Scenario settings.
