- 인터넷은 우리에게 자유를 주었습니다. 저희는 자유를 얻기 위해 지식을 통합하고 체계화하고 공유합니다. 랜선 위 정글에서 살아남기 위해 저희는 시키는 일만 하는 꿀벌 대신 고객을 위해 창조하고 혁신하는 게릴라가 되겠습니다. Seenbuy.kr is now Aiforu.kr.
- 024042463
- 01032667931
- [email protected]
Applying a secure certificate (SSL) to WordPress (converting to https): Includes Really Simple SSL (Security Certificate Installer Plugin)
Apply secure server SSL certificate to web hosting (switch to https)
Use paid https
Cafe 24
If you use Cafe24 hosting, you can do it for 38,500 won per year.
I tried all day to use the free secure server (SSL), but it didn’t work, so I paid for it. If my explanation below is insufficient, please refer to WPBOX.KR’s Cafe24 Web Hosting Security Server SSL Certificate Use of Port 443.
Apply
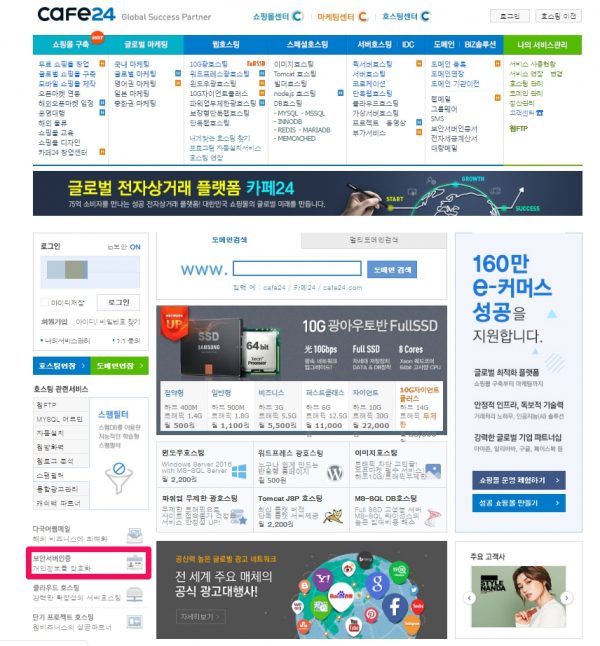
Please go to Cafe24 Security Server (SSL) Service Types and Price List to apply.

If the link to the security server application page ( https://hosting.cafe24.com/?controller=product_page&type=vservice&page=ssl) does not work, click “[Security server authentication] Encrypt personal information” (pink box) at the bottom left.
Write to apply
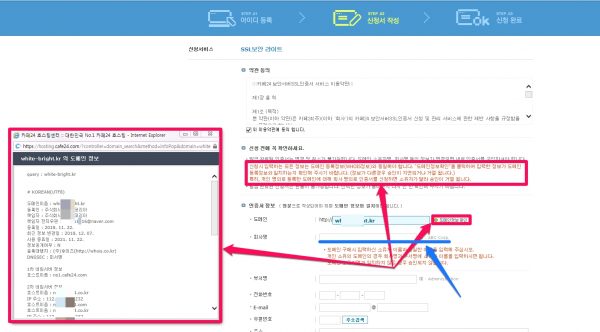
Click [Check domain information] to check domain information. All information entered at the time of application must be identical to the domain registration information (WHOIS information). Click “Check Domain Information” to check whether the entered information matches the domain registration information. (If the information is different, approval will be delayed or rejected.) In particular, if you apply for a certificate in the name of a company for a domain registered in your personal name, your approval will be rejected because the owner is different.
((Tip)) Problems related to international domains (com, net, org, biz, info, etc.)
[expand title=”상세 내용 보기” swaptitle=”상세 내용 접기”]
Registrant Name: NAVER Corp.
Registrant Organization: NAVER Corp.
Registrant Street: 6 Buljung-ro, Bundang-gu, Seongnam-si, Gyeonggi-do, 463-867, Korea
Registrant City: Gyeonggi
Registrant State/Province:
Registrant Postal Code: 463463
Registrant Country: KR
Registrant Phone: +82.215883829
Registrant Phone Ext:
Registrant Fax: +82.317841000
Registrant Fax Ext:
Registrant Email: [email protected]
Registry Admin ID: Not Available From Registry
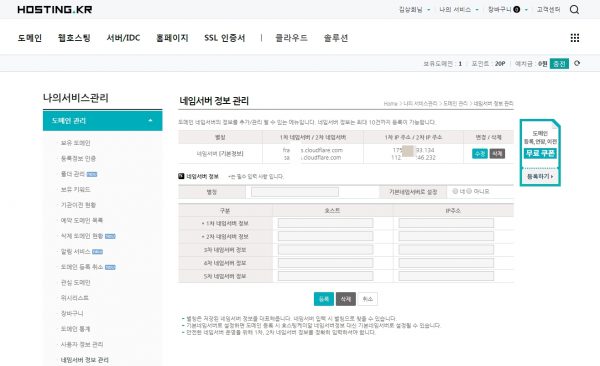
가. 카페24에서 무료 e-mail 계정, admin@exemple.com 을 생성하기
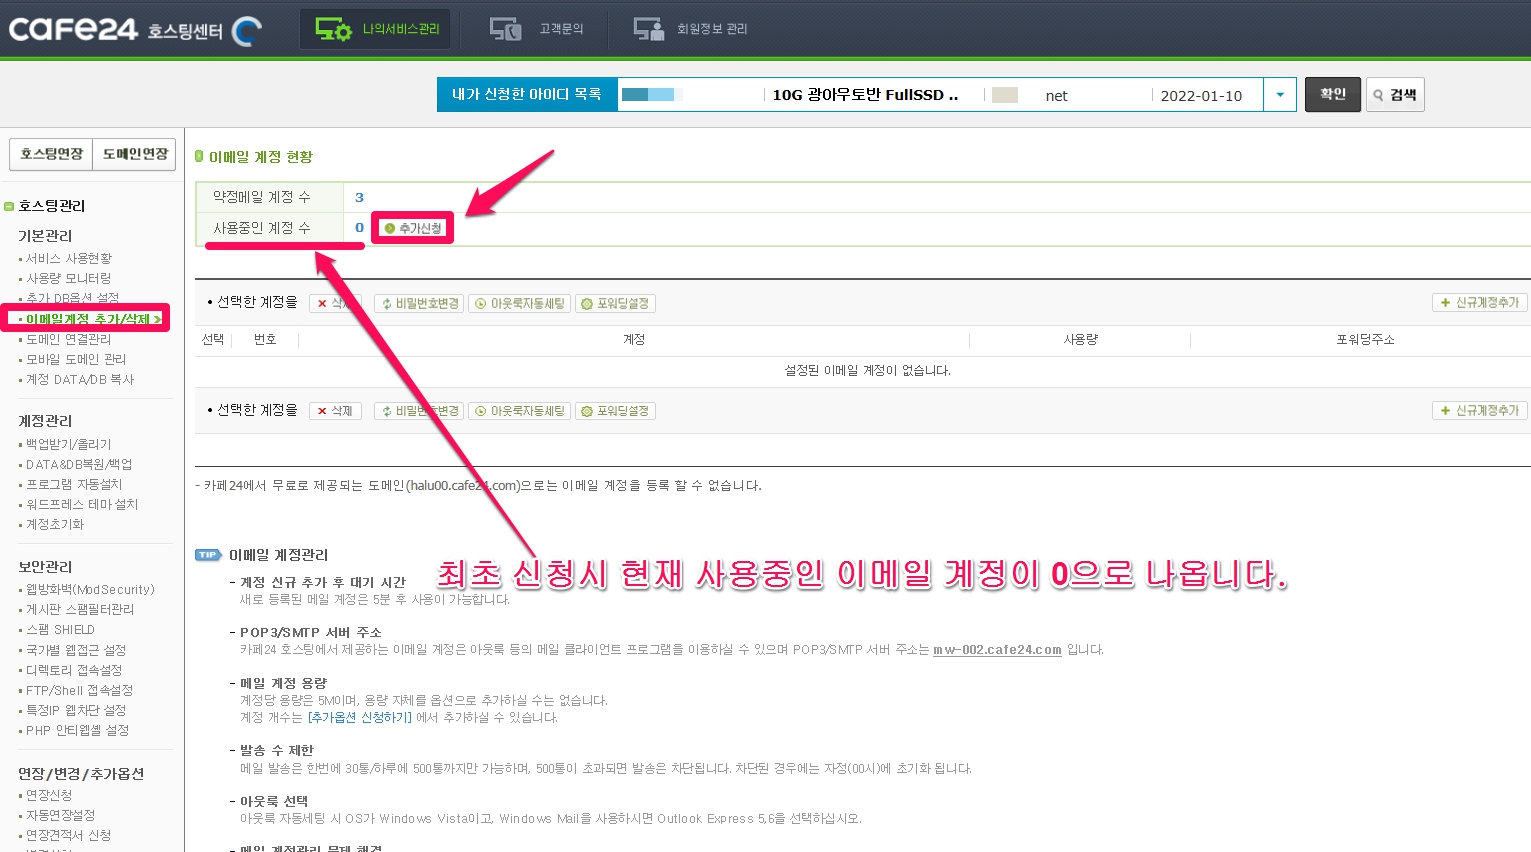
카페24 홈페이지에 로그인 -> [나의서비스관리]를 선택합니다.
왼쪽 메뉴에서 [호스팅관리] -> [기본관리] -> [이메일계정 추가/삭제] 를 차례로 선택합니다.
아래와 같이 이메일 계정을 등록하고 삭제할 수 있는 화면이 나옵니다. [추가신청] 버튼을 클릭하여 신청합니다.
이메일 계정을 추가하는 화면이 나옵니다.
사이트에서 사용할 신규 메일 계정(ex : [email protected] )을 입력하고 합니다. 도메인을 선택한 뒤에 확인 버튼을 클릭합니다.
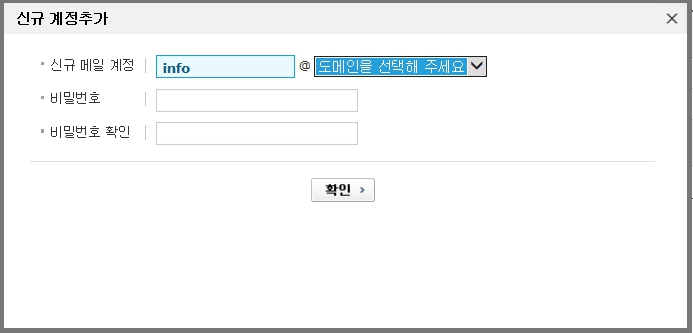
이메일이 추가되었다는 알림창이 뜹니다.

계정 신규 추가 후 대기 시간은 5분 후 사용이 가능하다가 나오는데 거의 실시간으로 생성됩니다.
나. 아웃룩에서 이용할 이메일 주소(카페24에서 만든 이메일 주소), 메일 서버 정보 등을 등록하는 계정 설정 하기
메일을 보내고 받을 수 있도록 해주기 위해서는 메일 서버가 필요합니다. 아웃룩의 이용자 계정 정보에 카페24에서 생성한 이메일 주소와 이 이메일 주소를 이용할 때 이용할 서버정보를 입력해주셔야 카페24 무료 이메일을 이용할 수 있습니다. 즉, 카페24에서는 이메일 계정만 생성하고 메일 서버는 아웃룩을 이용하는 구조입니다.
무료 POP3 를 이용하기 위해 이메일 계정생성 후 아웃룩 등의 메일 클라이언트 프로그램을 이용하실 수 있으며 아웃룩에서 이용할 이메일 주소(카페24에서 만든 이메일 주소), 메일 서버 정보등을 등록하는 설정을 해주셔야 하는데, 자동세팅 및 버전별 수동세팅 방법은 아래의 링크들을 이용해 주세요.
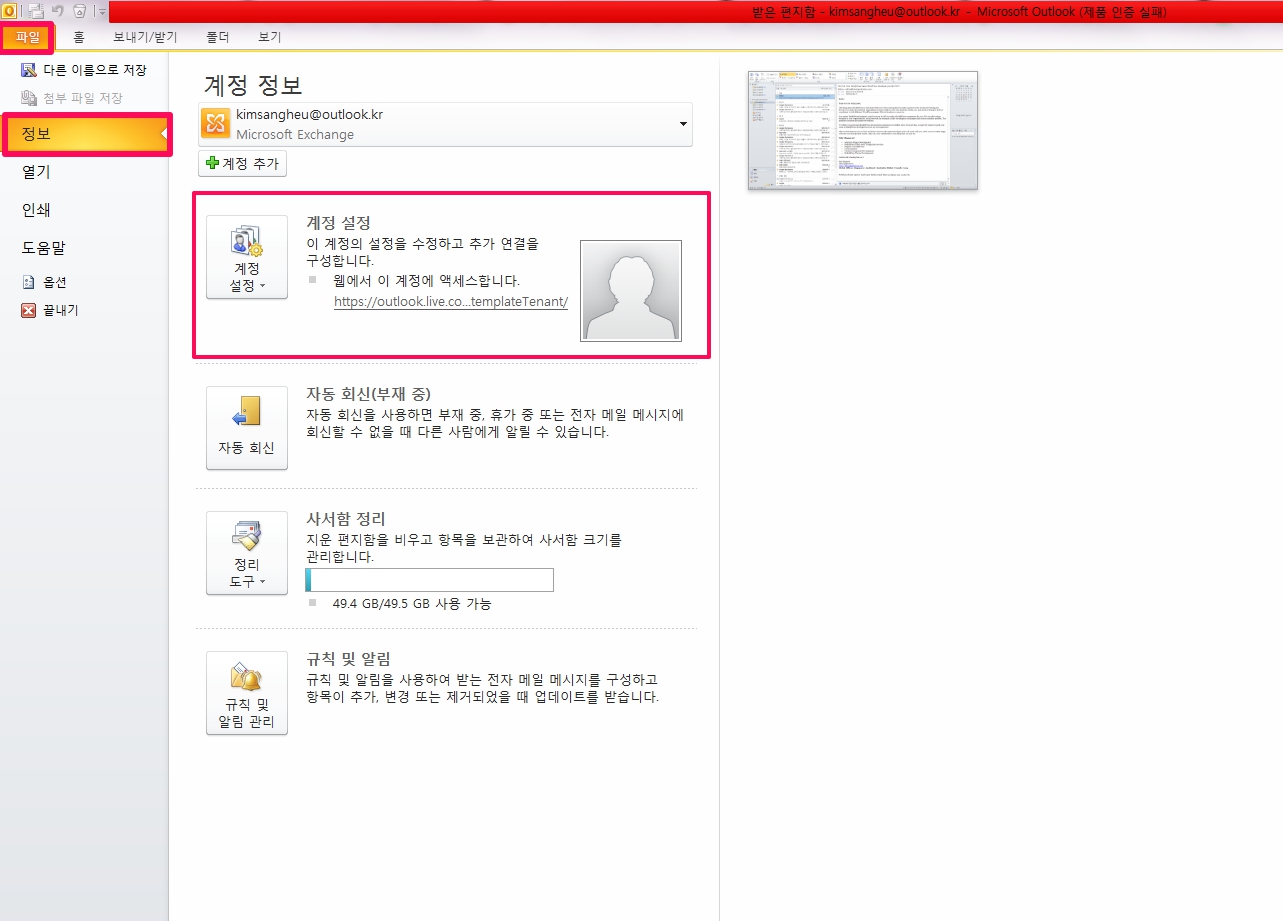
■ 기존에 아웃룩을 이용하시던 기기에서는 위에서 언급한 ‘신규로 PC버전 POP3 메일세팅 방법’ 나 ‘신규로 모바일 POP3 메일세팅 방법’처럼 초기 세팅화면이 나오지 않습니다. 아래의 윈도우 7의 아웃룩 2010을 캡처한 이미지인데 아웃룩에서 [파일] -> [정보] -> [계정 설정]을 선택하시면 메일 계정을 설정할 수 있는 창이 나옵니다.
이곳에서 설정을 해주시면 됩니다.
네이버, 다음, 구글, 네이트 외부메일설정 ( 참고 구글등 포털에서 네이버 외부 메일 설정으로 검색하시면 나오는 글들은 참조하지 마세요. 이 글들은 설명이 잘 되어 있으나 메일 포트 설정 부분이 틀려 외부메일 설정이 안됩니다. )
Company name, department, etc. must be written in English. : Please enter the same name as the Registrant Nameentered when purchasing the domain. For privately owned domains, you can enter the owner’s name in the Company Name and Department Name fields. If it doesn’t match the domain owner’s name, it won’t be approved
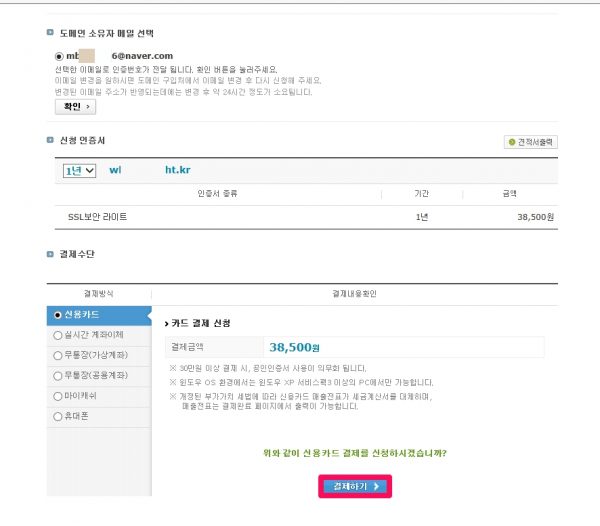
After you apply and pay, please check the ownership in the email for confirmation of ownership sent from comodo, the issuing authority of Cafe24’s certificate.

Click [here], and when a new window opens, copy the validation code received from the received email and enter it in the new window to complete the verification of ownership.

If the following window appears, close the window as it is.
Thank you
You have entered the correct Domain Control Validation code. Your certificate will now be issued and emailed to you shortly. Please close this window now.
(You have entered the correct domain control validation code. A certificate will be issued soon and will be emailed to you. )
When all certification procedures are completed, an email will be sent to the customer informing them of the completion of the certificate issuance within 24 business days. If you have not received the email or want to check the progress, check the progress through Cafe24, How to check the security certificate SSL application status below.
WordPress can be built with Really Simple SSL plugin, so please see the bottom of this post. (If you are using a site builder other than WordPress, you must download and install the secure server construction guide [here]. )
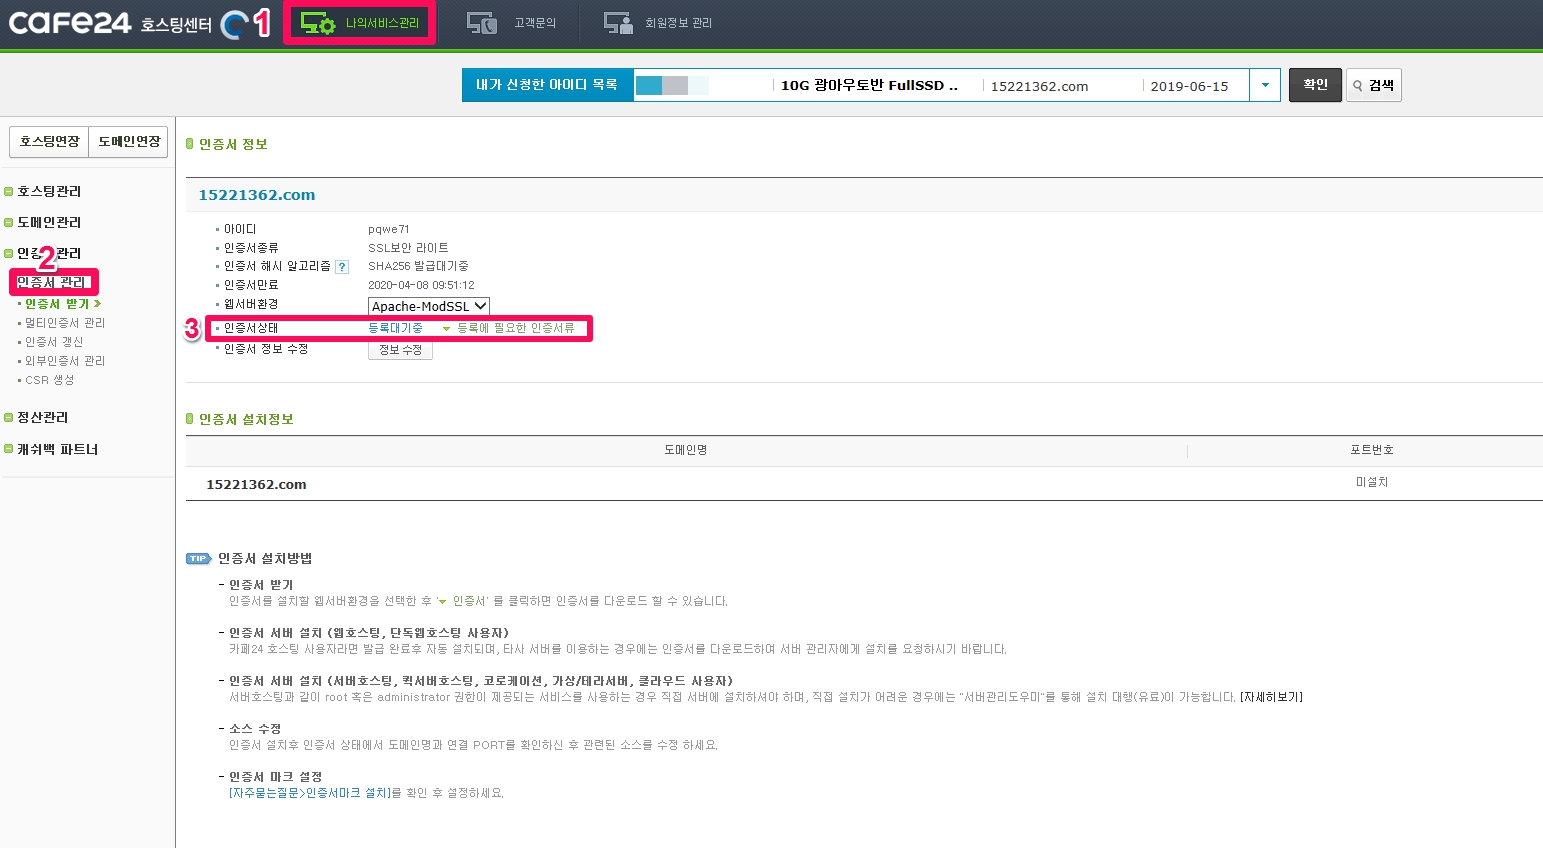
Cafe24, how to check the security certificate SSL application status
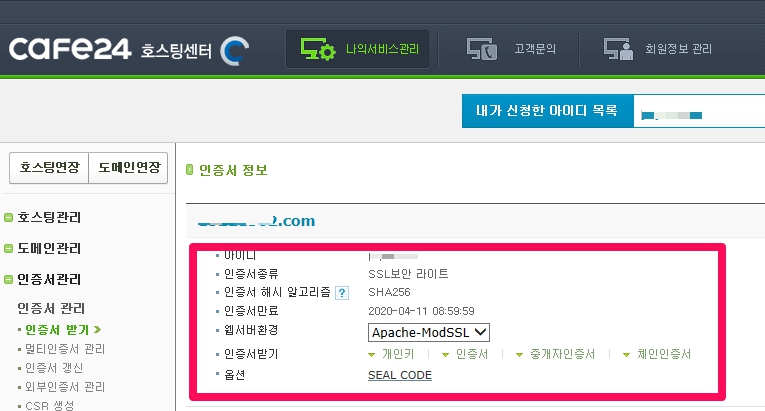
In Cafe24, go to [My Service Management] -> [Certificate Management] and check the status of the certificate to check the progress.
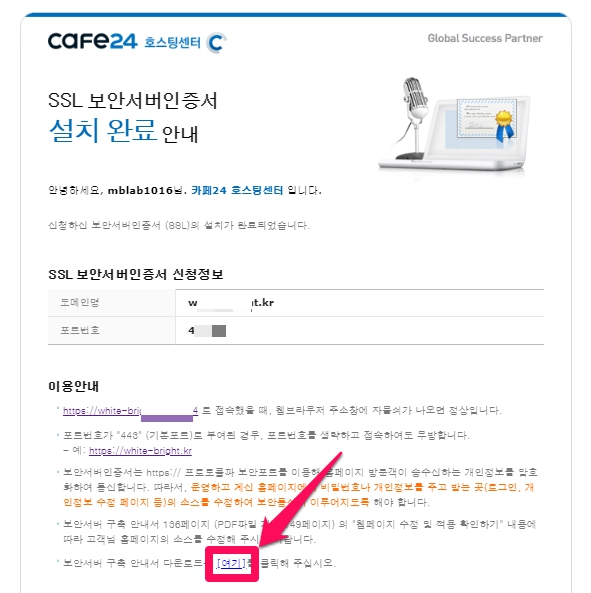
When the installation is complete, the details are displayed as shown below.
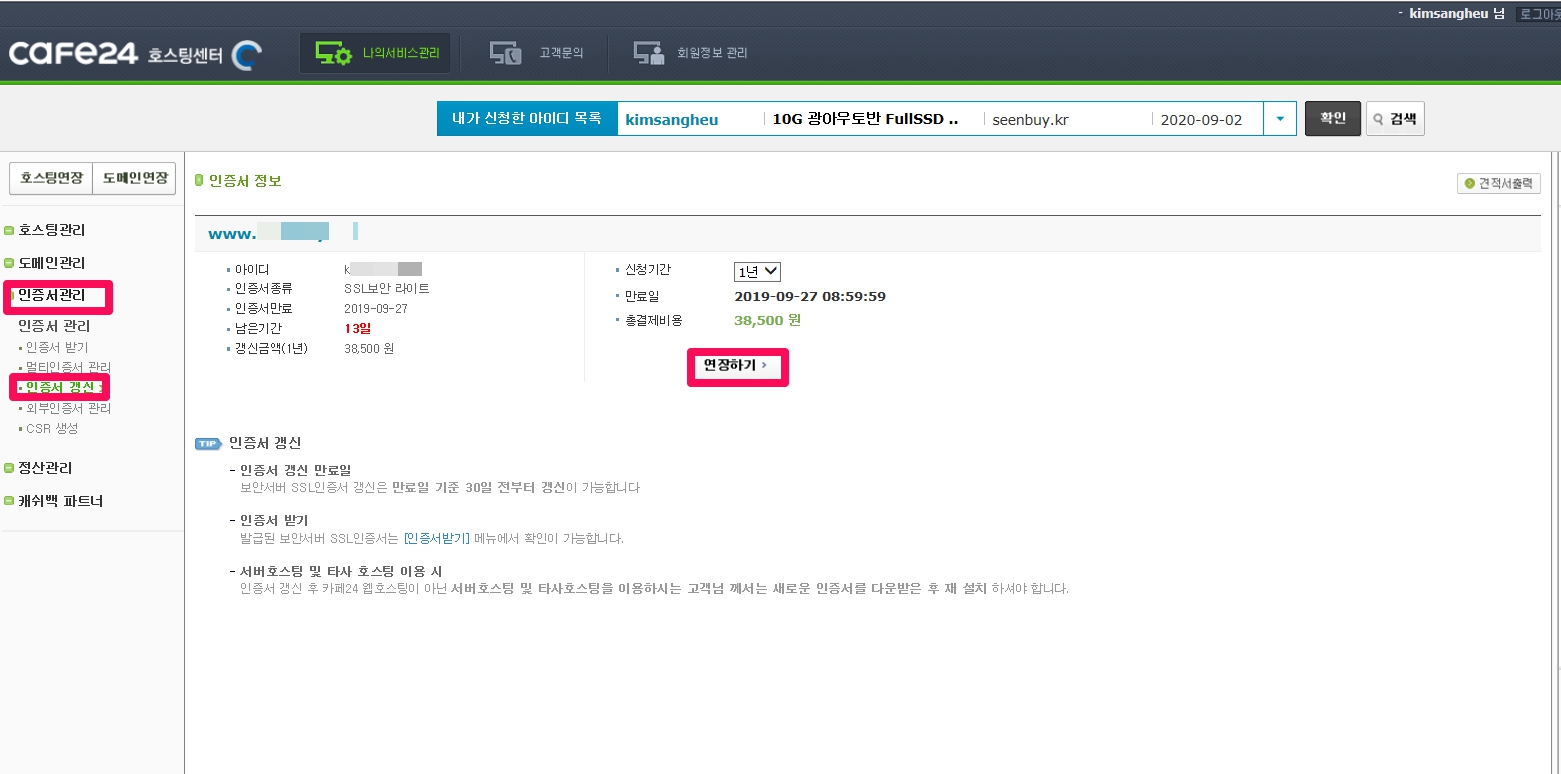
Certificate renewal
[expand title=”상세 내용 보기” swaptitle=”상세 내용 접기”]
[인증서 관리] -> [인증서 갱신]에서 [연장하기]로 갱신해줍니다.
결제를 완료하고 나면 소유권 확인하는 이메일을 받게 되고 아래의 이미지처럼 [click]하시어 누루신후 새로 열린창에 인증키를 넣으시면 갱신을 완료해주세요.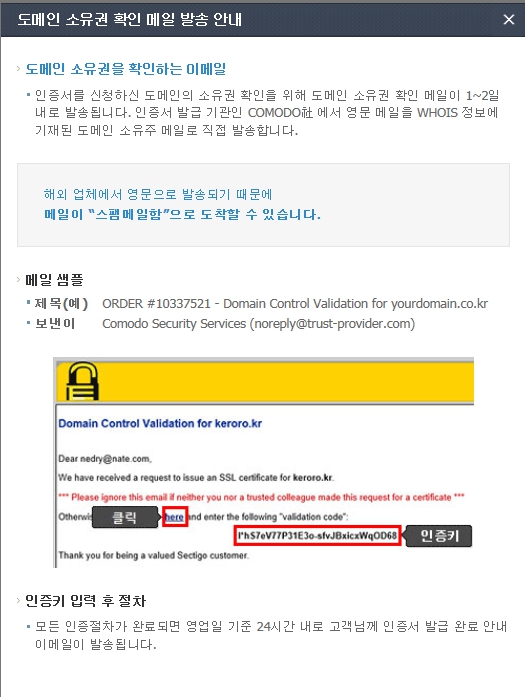
카페24호스팅에서 보안인증서 갱신되었는지 확인하는 방법
[인증서 관리] -> [인증서받기]에서 해당 도메인을 조회하여 인증서 만료일 갱신되었으면 보안인증서 갱신이 잘 된 것입니다. 워드프레스를 포함한 사이트빌더에서는 보안인증서 갱신을 위해 따로 해줄 것은 없습니다. 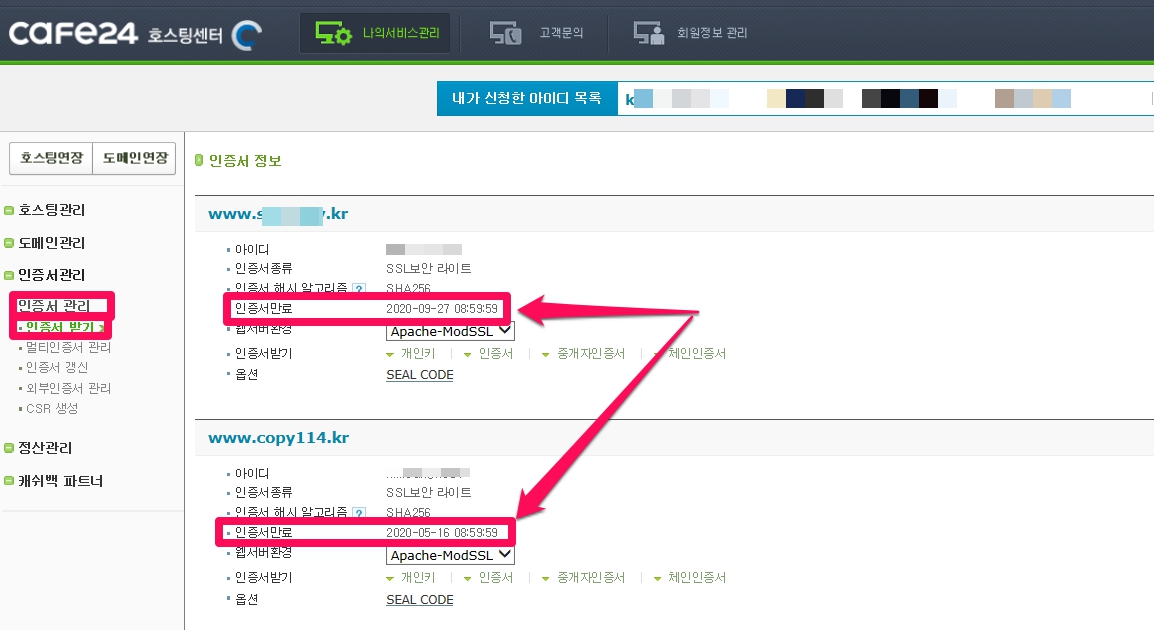
[/expand]
hosting.kr
Hosting KR ( https://www.hosting.kr) has SSL certificate products such as Alpha SSL: 55,000 won, Domain SSL: 150,000 won (Vat excluded).

Get free https
[expand title=”상세 내용 보기” swaptitle=”상세 내용 접기”]
1. LETSENCRYPT 에서 SSL 인증서를 무료로 발급 받아 웹 서버에 적용하기( 출처 : https://kr.minibrary.com/353/ )
이 방법은 무료인 장점이 있는데 상당히 기술적인 노력을 필요로합니다.
Letsencrypt는, “전 세계 모든 사이트를 HTTPS로 만들기!” 라는 슬로건으로 시작 된 오픈소스 프로젝트입니다. 2015년 12월 공개 베타 서비스를 시작하였습니다
Letsencrypt는 전 세계의 누구에게든, “무료”로 SSL 인증서를 발급해 줍니다. 이 인증서는 제대로 인증된 중개 기관 및 Root CA와의 체인이 되어, 공개적인 웹 사이트에서 사용할 수 있습니다.
단점이 존재하는데, 아래와 같은 제한이 있습니다. (2016년 7월 기준)
- 인증서의 최대 유효 기간은 90일 -> 3개월에 한 번씩은 인증서를 갱신해 주어야 합니다.
- certonly를 이용해 인증서만을 발급받을 경우, 80번 및 443번 포트의 사용을 중지 ->
Letsencrypt의Apache모듈 등을 사용하지 않고certonly를 사용할 경우, 현재 서비스 중인 웹 서비스를 중단해야 할 수 있습니다. - Asterisk (*.minibrary.com)을 사용할 수 없음 -> 서브 도메인을 만들어 SSL 인증서를 사용하려면, 해당 도메인을 위한 인증서를 발급 받아야 합니다.
2. cloudflare 를 이용하는 방법( https://www.cloudflare.com/ko-kr/ )
이 사이트는 한국어 버전을 가지고 있으므로 쉽게 접근할 수 있습니다. 개인적으로는 검색엔진최적화 관련하여 방문하여 상담을 해주었던 회사라 믿음이 갑니다.
그런데 약간의 문제가 있습니다. cloudflare 는 무료 https 이용하기는 가능하나 무료 flexible SSL 을 이용하는 경우, Super Progressive Web Apps 에서는 flexible SSL로 구축된 https는 Progressive Web Apps require that your website is served over HTTPS. Please contact your host to add a SSL certificate to your domain.(프로그레시브 웹 앱을 사용하려면 웹 사이트가 HTTPS를 통해 제공되어야합니다. 도메인에 SSL 인증서를 추가하려면 호스트에 문의하십시오.) 라는 error가 뜨며 plugin이 작동되지 않습니다. flexible SSL를 이용하는 https는 정식 https위에 구축된 website로 볼 수 없다는 것이죠.
Super Progressive Web Apps 이외의 플러그인은 적용해보지 않았습니다.
또한 Automatic HTTPS Rewrites 를 on 으로 화면 관리자 화면과 일반 보기화면이 잘 나옵니다. 그런데 쓰기 화면에 들어가면 구성요소들은 모두 모이는데 글의 편집 부분이 보이지 않아 편집을 할 수가 없는 문제가 발생합니다. https 로 자동변화되면서 생기는 문제같은데, 원인과 해결방법을 모르겠습니다.
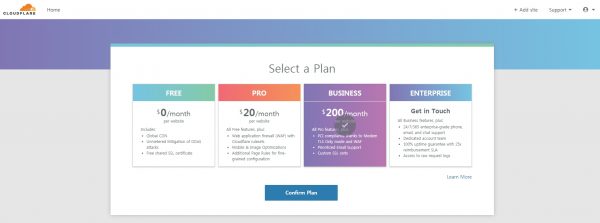
회원가입하면 바로 사이트를 추가하라고 나오는데 플랜은 Free로 하시는 경우, 1개의 site만 가능합니다.
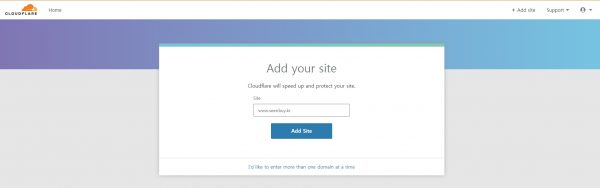
플랜은 Free로 하셔도 무료 서비스를 받는데 문제가 없습니다.
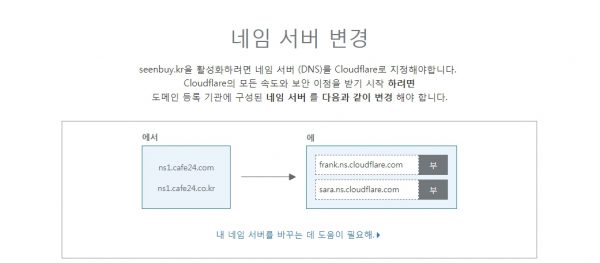
네임서버를 cloudflare 로 변경해줍니다.
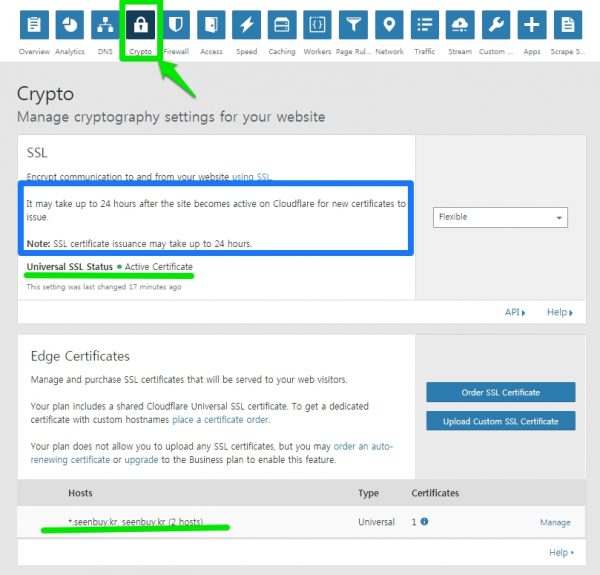
Crypto(암호)를 선택하면 Universal SSL(범용 SSL)이 활성화된 것을 확인할 수 있습니다.
하단의 도메인에는 기본도메인 seenbuy.kr 외에 *.seenbuy.kr 도 보입니다. 이것은 서브도메인까지 무료 서비스해주겠다는 의미입니다. (유료 SSL 인증서도 싼거는 [ * ]가 추가가 안됩니다. 하지만 CloudFlare는 기본 제공됩니다.)
네임서버를 변경한 후 SSL 인증서가 활성화되에는 최대24시간이 소요되므로 이 시간을 기다려주어야 합니다. (It may take up to 24 hours after the site becomes active on Cloudflare for new certificates to issue.(사이트에서 발급할 새 인증서가 Cloudflare에서 활성화되는데에는 최대 24 시간이 걸릴 수 있습니다.) Note: SSL certificate issuance may take up to 24 hours.(참고 : SSL 인증서 발급에는 최대 24 시간이 걸릴 수 있습니다.) )
Always use HTTPS
이 기능은 24시간이 인증서가 활성화된 이후에 해주세요. 인증서가 활성화되기 전에 on하시면 해당 사이트의 인증서에 문제가 있다는 문구와 함께 접속이 안됩니다.
구성표가 “http”인 모든 요청을 “https”로 리디렉션하십시오. 이것은 영역에 대한 모든 HTTP 요청에 적용됩니다.(Redirect all requests with scheme “http” to “https”. This applies to all http requests to the zone.)
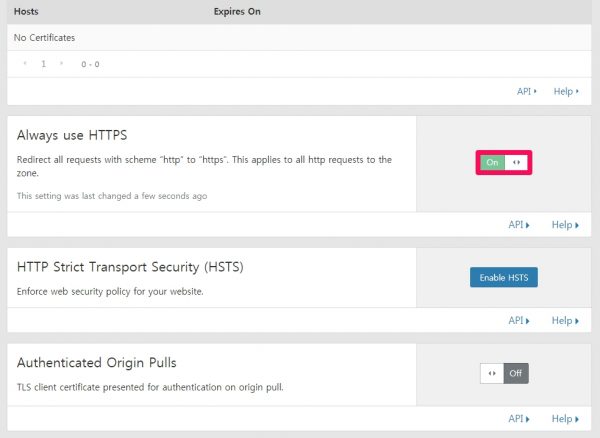
on 해주셔야 합니다. 그렇지 않으면 워드프레스의 관리자 화면이 깨져 나옵니다.

Automatic HTTPS Rewrites 를 on 으로 화면 관리자 화면과 일반 보기화면 잘 나옵니다. 그런데 쓰기 화면에 들어가면 구성요소들은 모두 모이는데 글의 편집 부분이 보이지 않아 편집을 할 수가 없는 문제가 발생합니다. https 로 자동변화되면서 생기는 문제같은데, 원인과 해결방법을 모르겠습니다.
[/expand]
Using Really Simple SSL (Security Certificate Installer Plugin)
Summary
A great plugin with over 2 million installations. (Even as of 18.10.6, countless complimentary comments are continuously coming up.)
- Version: 3.0.5
- Developers: Rogier Lankhorst, Mark Wolters
- Last updated: 3 개월 전에
- WordPress Version: 4.2 또는 이상
- Tested up to: 4.9.8
- PHP Version: 5.6 or higher
- Active installations: 2+ 백만
We will build an SSL secure authentication server with Really Simple SSL. (FYI, according to the Really Simple SSL plugin for WordPress, you seem to be using the WP Force SSL plugin a lot as well. WP Force SSL can redirect HTTP traffic to HTTPS without touching your code.)
Really Simple SSLautomatically detects your SSL settings and configures your website to use the https protocol. Install this plugin and it will automatically convert http traffic to https traffic.
If you arbitrarily change the two fields of the WordPress address (URL) and the site address (URL) in [Settings] – >[General] in the WordPress notice board, This plugin is in the settings >of the dashboard In the general, the WordPress address (URL) and the site address (URL) are https://… automatically change to ..
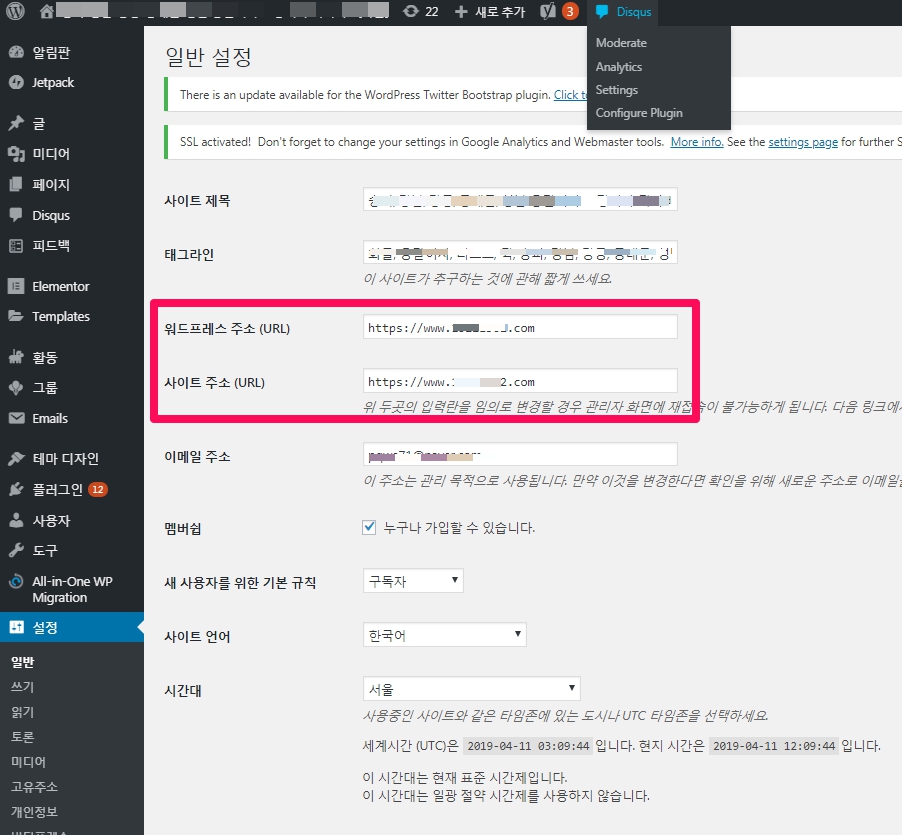
Note: If you are unable to reconnect to the admin screen due to arbitrarily changing the input fields of the WordPress address (URL) and site address (URL), please refer to the post below.
install
Really Simple SSL – Installation tutorial(1:29)
Really Simple SSL installation video (0:49)
Too simple is probably the only problem with this plugin.
Pre-work
It is recommended to take a backup of your site before activating SSL. WordPress can be easily backed up through the plugins below.
How to use
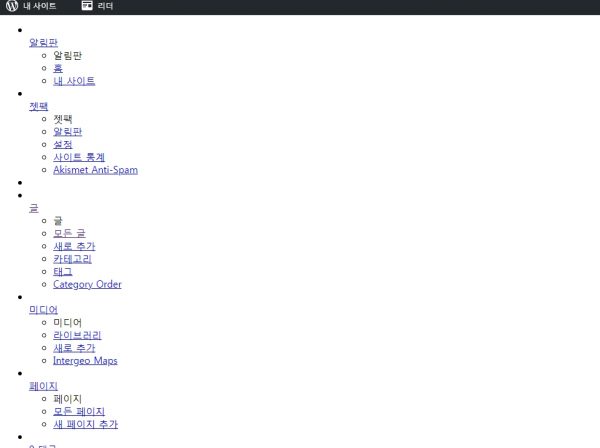
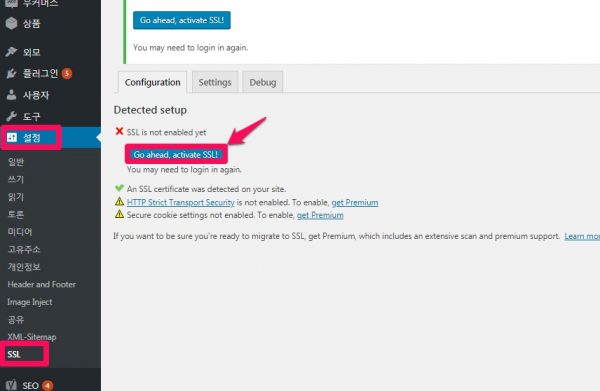
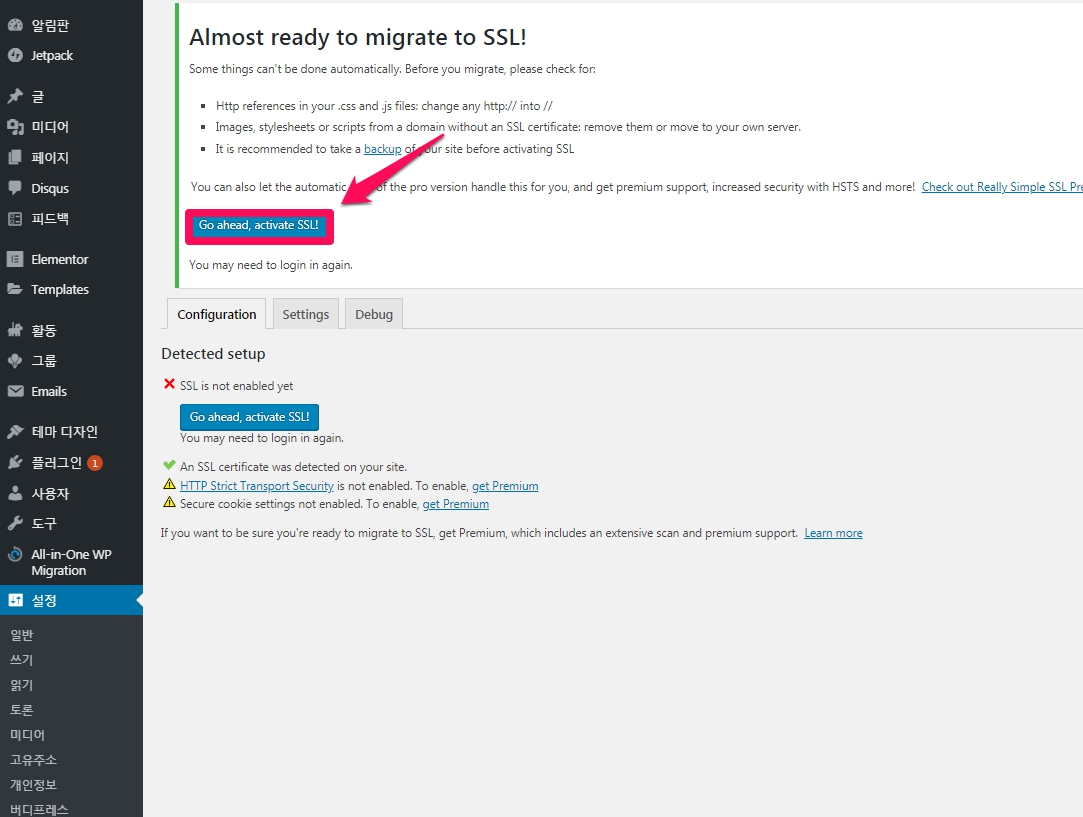
Go to [Settings] [SSL]-> on the admin page.
If you look at the middle part, it says that ( An SSL certificate was detected on your site. ), click [Go ahead, activate SSL!] to activate it. You can see that it has been changed to https, and you need to log in again (since it has been changed to https), so the login window appears. Please log in as usual. ( = Soon after, a message indicating that the session has expired appears. The login URL is changed from “http://exempl.com/wp-admin/” to “https://exempl.com/wp-admin/”. This is proof that it has been installed. You can log in again with id and pw as usual. )
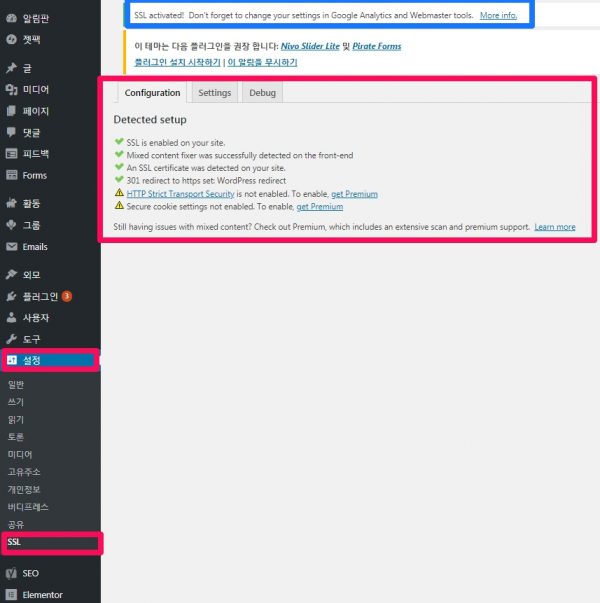
After 1 or 2 minutes, you will see a message indicating that the installation was successful as shown below.
| success | SSL is enabled on your site. | |
| success | Mixed content fixer was successfully detected on the front-end | |
| success | An SSL certificate was detected on your site. | |
| success | 301 redirect to https set: WordPress redirect |
This completes the installation.
To check that the installation was successful, go to [Settings] > [General] of the notice board and change the WordPress address (URL) and site address (URL) from http://… to https://… Make sure it has been changed to . If it is changed to https://…, the installation is complete.
Troubleshooting
‘No SSL detected’ error
I came across the following error. The cause was that, while initializing and initializing WordPress, the server was also upgraded to php7.0, and the SSL installed was also deleted. After requesting reinstallation from the hosting company Cafe24, it was detected normally and installation was completed.
Detected setup
| No SSL detected. |
| HTTP Strict Transport Security is not enabled. To enable, get Premium | ||
| Secure cookie settings not enabled. To enable, get Premium |
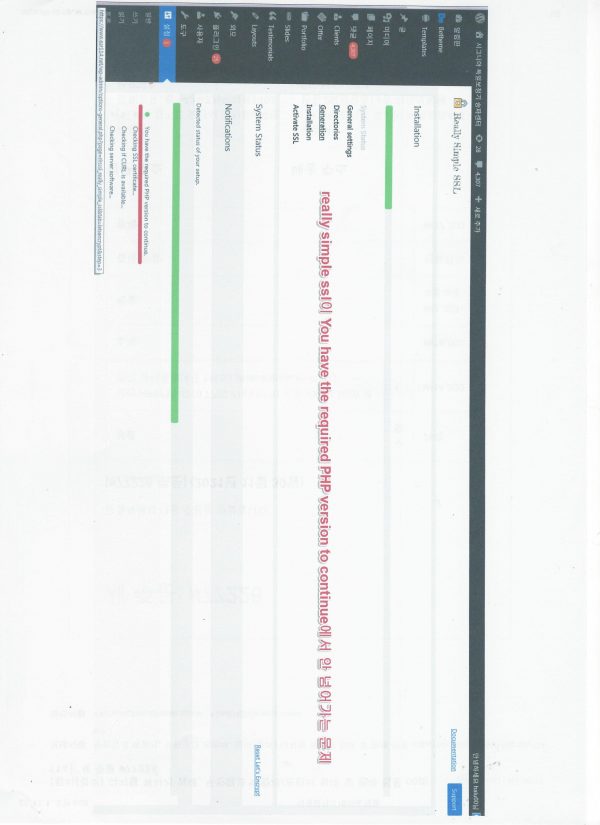
Detected status of your setup during Your progress You have the required PHP version to continue in Problem of continuously checking php without going to the next step
In my case, no matter how many times I tested, the same problem came up even if I deleted and reinstalled the plugin.
So, when I installed and tested the WP Force SSL & HTTPS Redirect plugin, I got the following error.
cURL 오류 60 : Peer’s certificate has expired
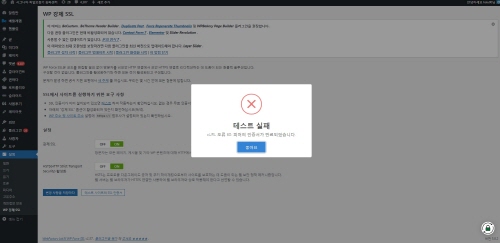
Also, when you open the webpage, the following message appears.
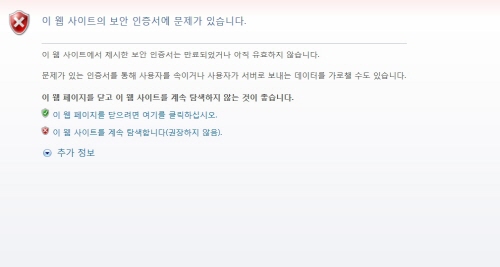
Cafe24’s certificate status shows that it is installed well. However, when I contacted Cafe24 with faith in the test results of the WP Force SSL & HTTPS Redirect plugin, I received the following answer. And it was solved. The problem was that two certificates were installed and one of them was expired.
Hello.
This is Cafe 24 Hosting Center.
When checking the contents of your inquiry, it is confirmed that the customer has issued a certificate to the exapmle.net domain address in the past and installed it on the server.
When issuing a certificate this time, it is confirmed that it was issued to the address www.example.net.
Due to this, two certificates of example.net / www.example.net are installed in the server, and it is confirmed that there is a problem.
I have deleted the expired certificate.
Remove plugin
If the plugin is removed, the path of all web pages including the WordPress address (URL) and site address (URL) in [Settings] -> [General] of the admin page is changed from https to http.
After uninstalling and reinstalling the plug-in, http is automatically changed to https, but an error appears saying the SSL security certificate is not detected as shown below.
Detected setup
| SSL is not enabled yet You may need to login in again. | ||
| An SSL certificate was detected on your site. |
Go ahead, activate SSL Literally, activate SSL. Occasionally, there is a technical problem, and an English notice appears saying that an e-mail will be sent to the person in charge of the solution.
Leverage the WP Force SSL & HTTPS Redirect plugin
- Version:1.57
- Last updated:5 months ago
- Active installations:100,000+
- WordPress Version:4.6 or higher
- Tested up to:5.8.2
- PHP Version:5.2 or higher
This plugin also has over 100,000 active users and is very easy to use. It is recommended as an alternative to the Really Simple SSL plugin.
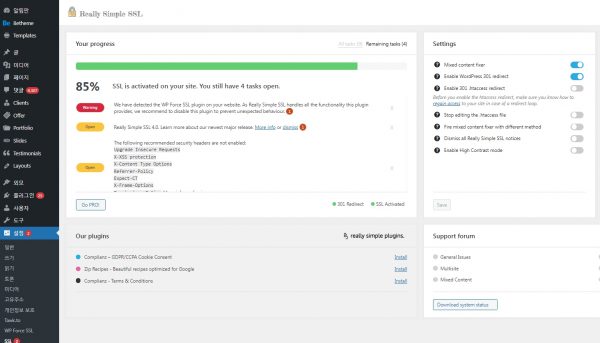
If you use Really Simple SSL and WP Force SSL & HTTPS Redirect plugin together, Really Simple SSL will display a warning message like the one below, so please disable it or do not use it together.
We have detected the WP Force SSL plugin on your website. As Really Simple SSL handles all the functionality this plugin provides, we recommend to disable this plugin to prevent unexpected behaviour.
Redirect all http traffic to https traffic
( source: How to apply secure server SSL certificate to WordPress )
Install a plugin such as Really Simple SSL and it will automatically convert http traffic to https traffic.
Alternatively, you can add the following code to your .htaccess file.
RewriteEngine On
RewriteCond %{HTTPS} off
RewriteRule ^(.*)$ https://%{HTTP_HOST}%{REQUEST_URI} [L,R=301]
Your WordPress site should now have SSL applied normally.
If the above tasks are not easy, you can also request a service here.
Follow-up
Change http to https in Google Analytics and Webmaster Tools.
SSL activated! Don’t forget to change your settings in Google Analytics and Webmaster tools. More info.
Google Analytics
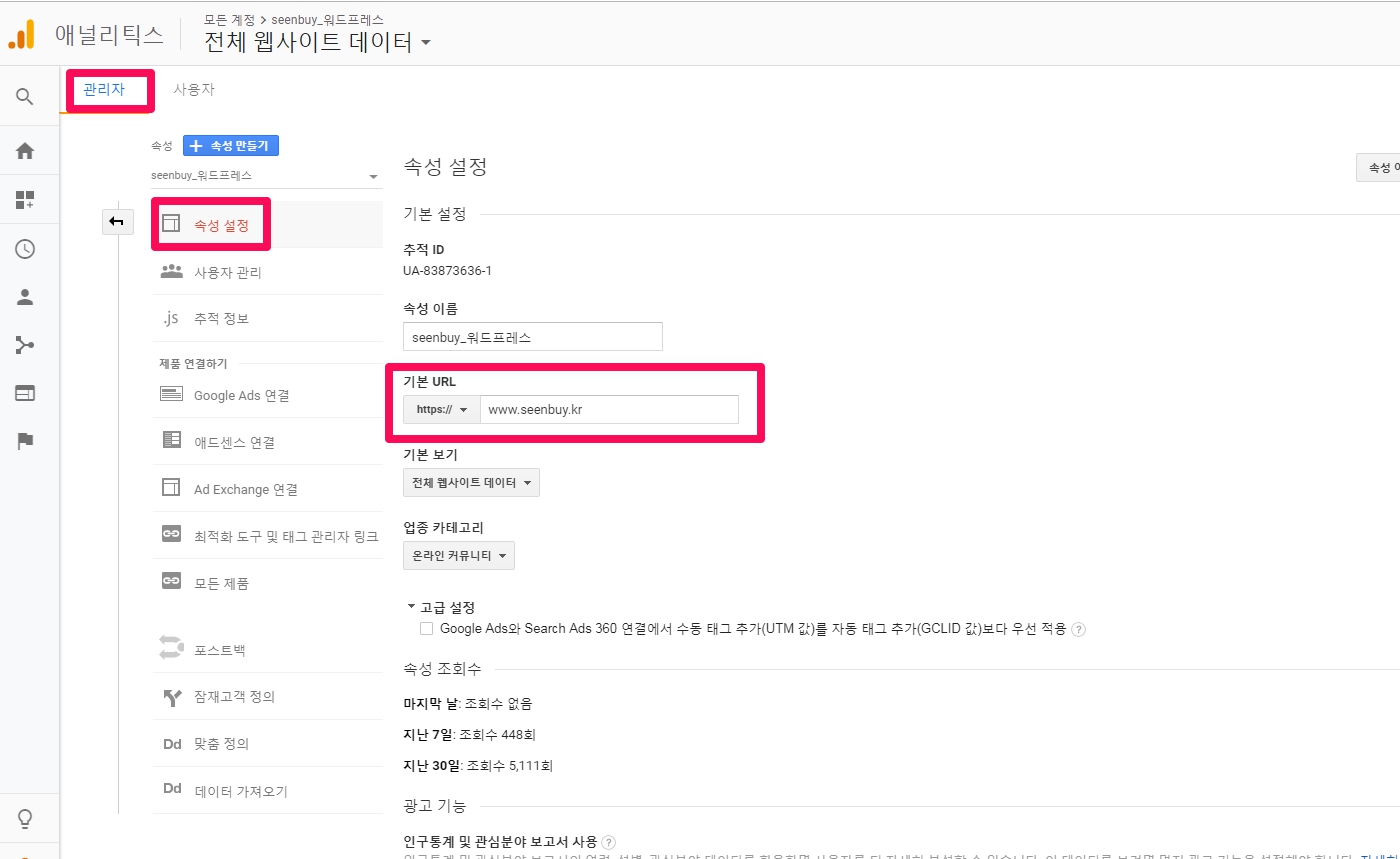
Change the URL from http to https in Google Analytics. It is important to change the URL in [View Settings] for tracking, but change both together with [Properties Settings]. (Note: The tracking code is not changed, so you do not have to worry about the code you put in the header or the tracking file uploaded by ftp.)
First, click [Set properties] in [Admin] -> [Properties] and change the base URL.
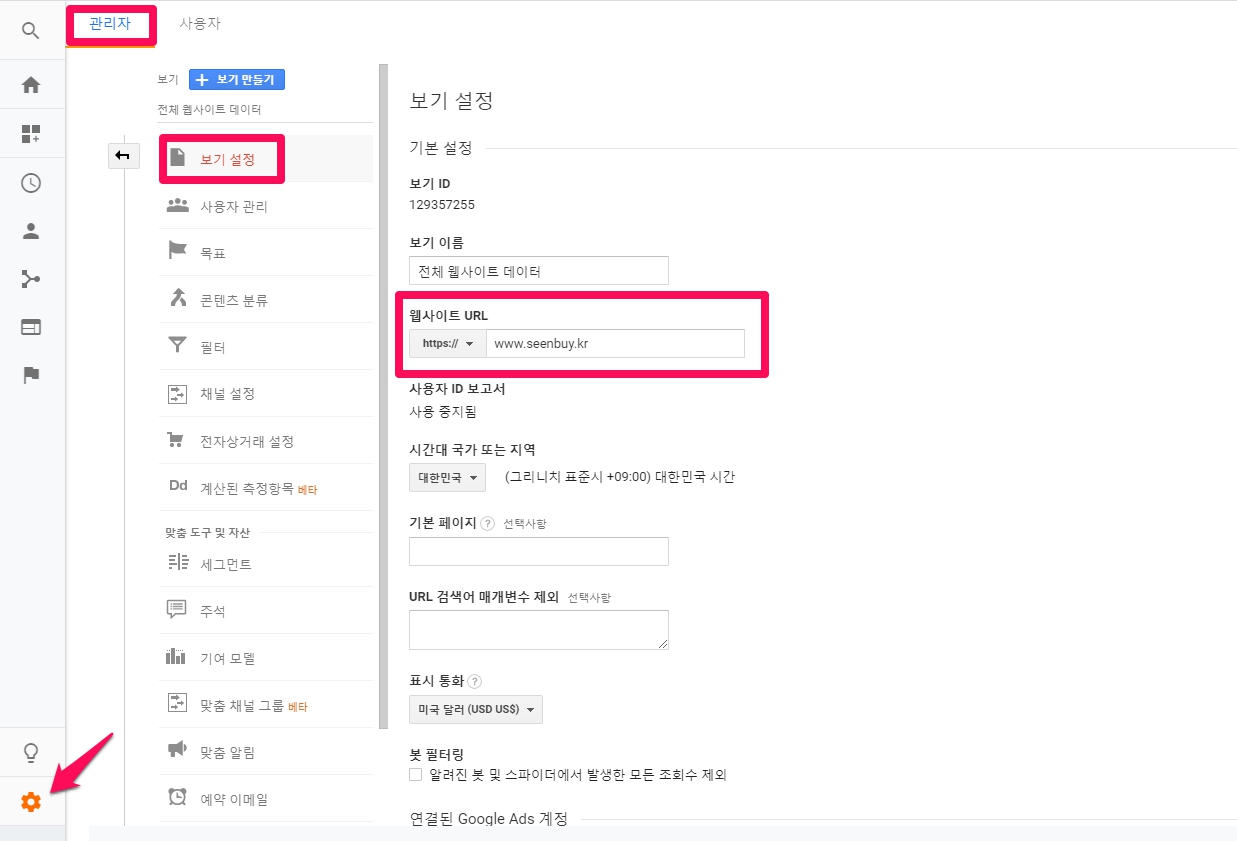
Then click [Admin] -> [View] -> [View Settings] and change the website URL.
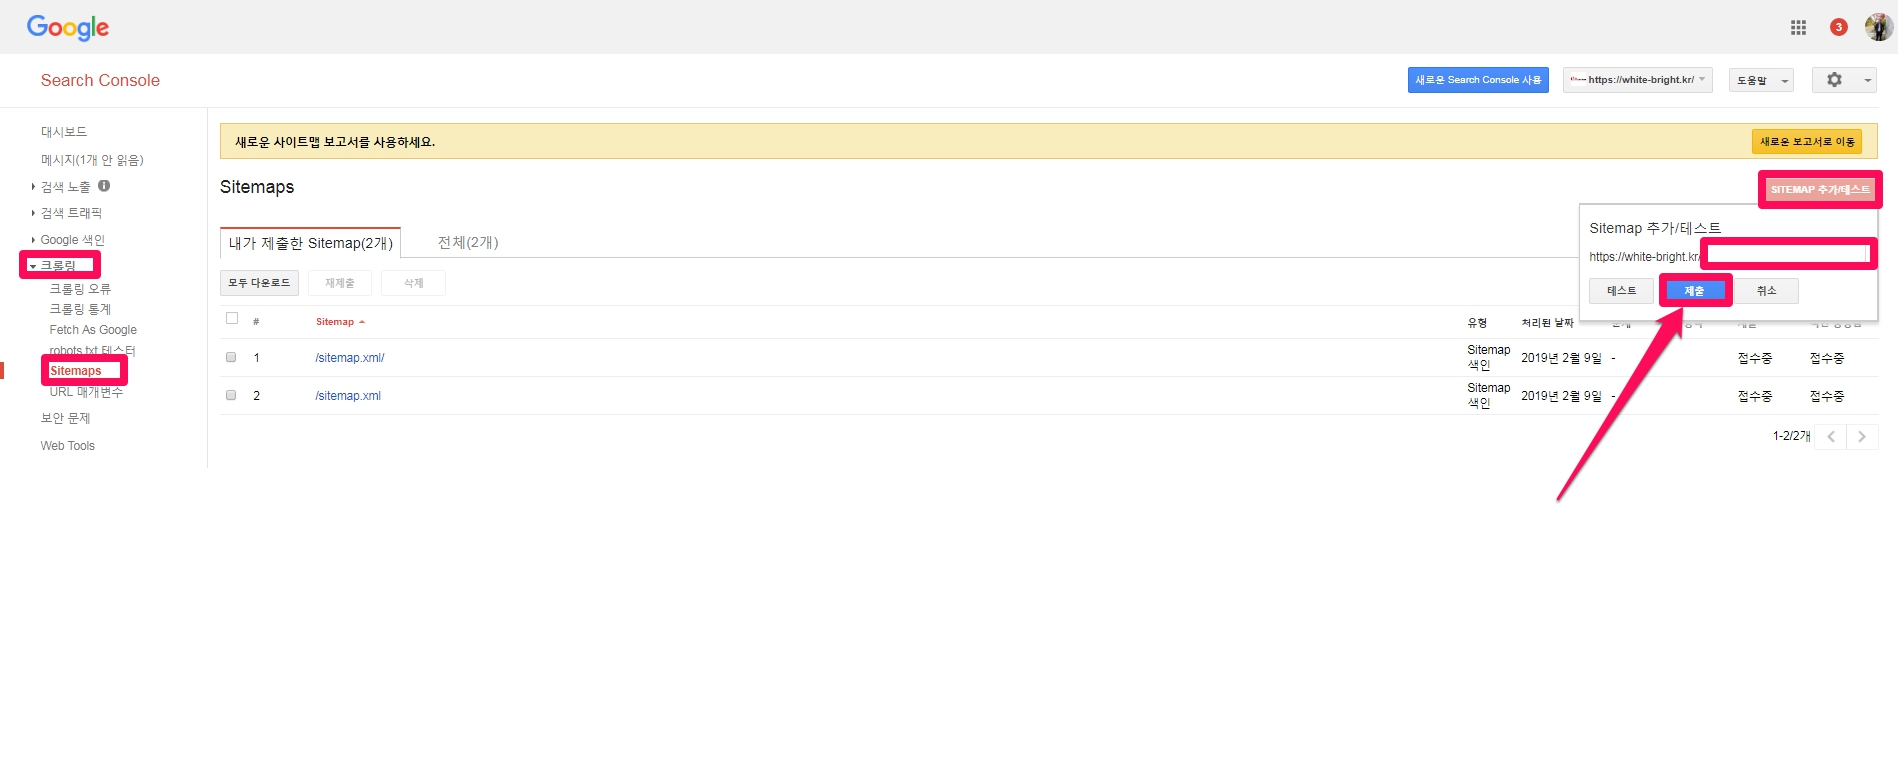
Google Search Console (formerly Google Webmaster Tools)
Go to https://www.google.com/webmasters/tools/home?hl=en, delete the existing http attribute, create a new https attribute, and resubmit the sitemap. (Note: By default, Word The sitemap path and address of the press will be https:/exemple.com/sitemap.xml )
Change http to https in Naver Analytics and Webmaster Tools.
Naver Webmaster Tools( https://webmastertool.naver.com )
Just like in Google Search Console, delete the existing http site, add an https site, and resubmit the sitemap. (Note: The code for verifying ownership does not change, so you do not have to worry about the code you put in the header or the trace file uploaded by ftp.)

References: 1. Really Simple SSL plugin for WordPress
2. Apply Secure Server SSL Certificate to WordPress
3. Cafe24 web hosting security server SSL certificate 443 port usage
